Commerce Tracking with Google Analytics for Android
Posted: 2011-05-05 14:17:05 UTC-07:00
[This post is by Jim Cotugno and Nick Mihailovski, engineers who work on Google Analytics — Tim Bray]Today we released a new version of the Google Analytics Android SDK which includes support for tracking e-commerce transactions. This post walks you through setting it up in your mobile application.Why It’s Important
If you allow users to purchase goods in your application, you’ll want to understand how much revenue your application generates as well as which products are most popular.With the new e-commerce tracking functionality in the Google Analytics Android SDK, this is easy.Before You Begin
In this post, we assume you’ve already configured the Google Analytics Android SDK to work in your application. Check out our SDK docs if you haven’t already.We also assume you have a Google Analytics tracking object instance declared in your code:GoogleAnalyticsTracker tracker;Then in the activity’s onCreate method, you have initialized the tracker member variable and called start:tracker = GoogleAnalyticsTracker.getInstance(); tracker.start("UA-YOUR-ACCOUNT-HERE", 30, this);Setting Up The Code
The best way to track a transaction is when you’ve received confirmation for a purchase. For example, if you have a callback method that is called when a purchase is confirmed, you would call the tracking code there.public void onPurchaseConfirmed(Listpurchases) { // Use Google Analytics to record the purchase information here... } Tracking The Transaction
The Google Analytics Android SDK provides its own Transaction object to store values Google Analytics collects. The next step is to copy the values from the list of PurchaseObjects into a Transaction object.The SDK’s Transaction object uses the builder pattern, where the constructor takes the required arguments and the optional arguments are set using setters:Transaction.Builder builder = new Transaction.Builder( purchase.getOrderId(), purchase.getTotal()) .setTotalTax(purchase.getTotalTax()) .setShippingCost(purchase.getShippingCost() .setStoreName(purchase.getStoreName());You then add the transaction by building it and passing it to a Google Analytics tracking Object:tracker.addTransaction(builder.build());Tracking Each Item
The next step is to track each item within the transaction. This is similar to tracking transactions, using the Item class provided by the Google Analytics SDK for Android. Google Analytics uses the OrderID as a common ID to associate a set of items to it’s parent transaction.Let’s say the PurchaseObject above has a list of one or more LineItem objects. You can then iterate through each LineItem and create and add the item to the tracker.for (ListItem listItem : purchase.getListItems()) { Item.Builder itemBuilder = new Item.Builder( purchase.getOrderId(), listItem.getItemSKU(), listItem.getPrice(), listItem.getCount()) .setItemCategory(listItem.getItemCategory()) .setItemName(listItem.getItemName()); // Now add the item to the tracker. The order ID is the key // Google Analytics uses to associate this item to the transaction. tracker.addItem(itemBuilder.build()); }Sending the Data to Google Analytics
Finally once all the transactions and items have been added to the tracker, you call:tracker.trackTransactions();This sends the transactions to the dispatcher, which will transmit the data to Google Analytics.Viewing The Reports
Once data has been collected, you can then log into the Google Analytics Web Interface and go to the Conversions > Ecommerce > Product Performance report to see how much revenue each product generated.
Here we see that many people bought potions, which generated the most revenue for our application. Also, more people bought the blue sword than the red sword, which could mean we need to stock more blue items in our application. Awesome!Learning More
You can learn more about the new e-commerce tracking feature in the Google Analytics SDK for Androiddeveloper documentation.What’s even better is that we’ll be demoing all this new functionality this year at Google IO, in the Optimizing Android Apps With Google Analytics session.


Merchant Sales Reports on Android Market
Posted: 2011-04-26 09:15:05 UTC-07:00
[This post is by Eric Chu, Android Developer Ecosystem. —Dirk Dougherty]As part of our ongoing efforts to provide better tools to help you manage your business, we are introducing merchant sales reporting on Android Market. Developers now have convenient access to monthly reports that detail the financial performance of their applications directly from the Android Market Developer Console.Based on Google Checkout financial data, these reports provide per-transaction details including additional information such as device information, currency of sale, and currency conversion rate. Developers will be able to easily download these reports as a CSV (comma-separated values) files to enable further analysis at their convenience.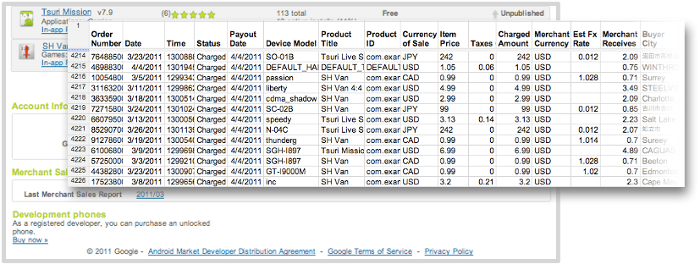
Starting today, developers can download merchant sales reports for March 2011 from the Developer Console. Reports for months going back to January 2010 will be available in the coming weeks. Moving forward, sales reports for each month will be available by the 10th day of the following month.We hope you’ll find these new sales reports useful. As always, please don’t hesitate to give us feedback through Market Help Center.


Customizing the Action Bar
Posted: 2011-04-13 14:39:58 UTC-07:00

[This post is by Nick Butcher, an Android engineer who notices small imperfections, and they annoy him. — Tim Bray]Since the introduction of the Action Bar design pattern, many applications have adopted it as a way to provide easy access to common actions. In Android 3.0 (or Honeycomb to its friends) this pattern has been baked in as the default navigation paradigm and extended to take advantage of the extra real-estate available on tablets. By using the Action Bar in your Honeycomb-targeted apps, you'll give your users a familiar way to interact with your application. Also, your app will be better prepared to scale across the range of Android devices that will be arriving starting in the Honeycomb era.Just because Action Bars are familiar, doesn’t mean that they have to be identical! The following code samples and accompanying project demonstrate how to style the Action Bar to match your application’s branding. I’ll demonstrate how to take Honeycomb’sHolo.Lighttheme and customise it to match this blog’s colour scheme.<style name="Theme.AndroidDevelopers" parent="android:style/Theme.Holo.Light"> … </style>Icon
This step is easy; I’ll use the wonderful Android Asset Studio to create an icon in my chosen colour scheme. For extra credit, I’ll use this image as a starting point to create a more branded logo.
Navigation
Next up, the navigation section of the Action Bar operates in three different modes; I’ll tackle each of these in turn.Standard
The Action Bar’s standard navigation mode simply displays the title of the activity. This doesn’t require any styling... next!List
To the left, a standard list drop-down; to the right, the effect we want to achieve.
The default styling in list navigation mode has a blue colour scheme. This is evident when touching the collapsed control in both the top bar, and the selection highlight in the expanded list. We can theme this element by overriding android:actionDropDownStyle with a custom style to implement our colour scheme:<!-- style the list navigation --> <style name="MyDropDownNav" parent="android:style/Widget.Holo.Light.Spinner.DropDown.ActionBar"> <item name="android:background">@drawable/ad_spinner_background_holo_light</item> <item name="android:popupBackground">@drawable/ad_menu_dropdown_panel_holo_light</item> <item name="android:dropDownSelector">@drawable/ad_selectable_background</item> </style>The above uses a combination of state list drawables and 9 patch images to style the collapsed spinner, the top bar of the expanded list and sets the highlight colour when picking an item.Tabs
Here are the before-and-after shots on the tab navigation control:
The tab navigation control uses the standard blue colouring. We can apply a custom style toandroid:actionBarTabStyle to set our own custom drawable that uses our desired palette:<!-- style for the tabs --> <style name="MyActionBarTabStyle" parent="android:style/Widget.Holo.Light.ActionBarView_TabView"> <item name="android:background">@drawable/actionbar_tab_bg</item> <item name="android:paddingLeft">32dp</item> <item name="android:paddingRight">32dp</item> </style>Actions
Before-and-after on the individual items in the Action Bar:
The individual action items inherit the default blue background when selected. We can customise this behaviour by overriding android:selectableItemBackground and setting a shape drawable with our desired colouring:<item name="android:selectableItemBackground">@drawable/ad_selectable_background</item>The overflow menu also needs some attention as when expanded it shows a blue bar at the top of the list. We can override android:popupMenuStyle and set a custom drawable (in fact the very same drawable we previously used for list navigation) for the top of the overflow menu:<!-- style the overflow menu --> <style name="MyPopupMenu" parent="android:style/Widget.Holo.Light.ListPopupWindow"> <item name="android:popupBackground">@drawable/ad_menu_dropdown_panel_holo_light</item> </style>Selecting items within the overflow menu also show the default selection colour. We can set our customised selection colour by overriding android:dropDownListViewStyle:<!-- style the items within the overflow menu --> <style name="MyDropDownListView" parent="android:style/Widget.Holo.ListView.DropDown"> <item name="android:listSelector">@drawable/ad_selectable_background</item> </style>These changes gets us most of the way there but it’s attention to detail that makes an app. Check boxes and radio buttons within menu items in the overflow section are still using the default assets which have a blue highlight. Let’s override them to fit in with our theme:<item name="android:listChoiceIndicatorMultiple">@drawable/ad_btn_check_holo_light</item> <item name="android:listChoiceIndicatorSingle">@drawable/ad_btn_radio_holo_light</item>
Background
I’ve left the background transparent as inheriting form Holo.Light works well for our desired palette. If you’d like to customise it you easily override theandroid:backgrounditem on the android:actionBarStyle style:<style name="MyActionBar" parent="android:style/Widget.Holo.Light.ActionBar"> <item name="android:background">@drawable/action_bar_background</item> </style>Bringing it all together
Putting all of these components together we can create a custom style:<style name="Theme.AndroidDevelopers" parent="android:style/Theme.Holo.Light"> <item name="android:selectableItemBackground">@drawable/ad_selectable_background</item> <item name="android:popupMenuStyle">@style/MyPopupMenu</item> <item name="android:dropDownListViewStyle">@style/MyDropDownListView</item> <item name="android:actionBarTabStyle">@style/MyActionBarTabStyle</item> <item name="android:actionDropDownStyle">@style/MyDropDownNav</item> <item name="android:listChoiceIndicatorMultiple">@drawable/ad_btn_check_holo_light</item> <item name="android:listChoiceIndicatorSingle">@drawable/ad_btn_radio_holo_light</item> </style>We can then apply this style to either an individual activity or to the entire application:<activity android:name=".MainActivity" android:label="@string/app_name" android:theme="@style/Theme.AndroidDevelopers" android:logo="@drawable/ad_logo">Note that some of the system styles that we have overridden in this example will affect much more than the Action Bar. For example overriding android:selectableItemBackground will effect many widgets which support a selectable state. This is useful for styling your entire application but be sure to test that your customisations are applied consistently throughout.Familiar but styled
Customising the action bar is a great way to extend your application’s branding to the standard control components. With this power, as they say, comes great responsibility. When customising the user interface you must take great care to ensure that your application remains legible and navigable. In particular, watch out for highlight colours which contrast poorly with text and provide drawables for all relevant states. Explorethis demo application which exercises the functionality offered by the Action Bar and demonstrates how to theme it.


Android Developer Challenge, Sub-Saharan Africa!
Posted: 2011-04-14 07:56:37 UTC-07:00
[This post is by Bridgette Sexton, an innovation advocate for the African tech community. — Tim Bray]In the past year alone, we have met with over 10,000 developers and techies across Sub Saharan Africa. We are continually impressed by the ingenuity and enthusiasm of this community in solving real problems with technology. From applications that crowd-source traffic info to mobile registration of local businesses, handheld devices have taken center stage for consumers and developers in Africa. With a number of countries in the region hovering around 80-90% mobile penetration, mobile is the screen size for the web and the communication experience.
Correspondingly, at every Google event in Africa, Android is the hottest topic; we know why. Every day over 300,000 Android devices are activated globally! A growing number of these mobile devices are powering on for the first time in emerging markets like those in Africa. As Android users multiply, so does the appeal to for developers of building apps on this free open-source platform.
An increasing number of users are searching for 'Android' on Google in Sub-Saharan AfricaFor all these reasons and more, we are proud to be launching the Android Developer Challenge for Sub-Saharan Africa!The Android Developer Challenge is designed to encourage the creation of cool and innovative Android mobile apps built by developers in Sub-Saharan Africa. Invent apps that delight users and you stand a chance to win an Android phone and $25,000 USD. To get started, choose from one of three defined eligible categories (see below), build an Android app in a team or by yourself, and submit it via the competition website by July 1st. The winning app will be announced on September 12th at G-Kenya. Get more details as well as Terms and Conditions on our site.Categories for Entry:- Entertainment / Media / Games
- Social Networking / Communication
- Productivity / Tools / Lifestyle
(See Terms & Conditions for more details!)To launch this competition, we have teamed up with Google Technology User Groups (GTUGs) across Africa to host Android Developer Challenge events. Check out our website for Android gatherings near you, and get coding!


New Carrier Billing Options on Android Market
Posted: 2011-04-13 11:31:48 UTC-07:00
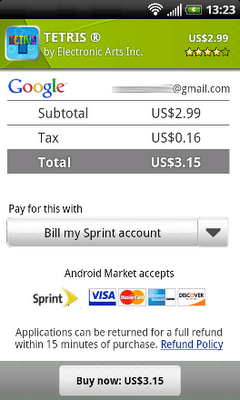
[This post is by Eric Chu, Android Developer Ecosystem. —Dirk Dougherty]Since last year, we’ve been working to bring the convenience of Direct Carrier Billing to more Android Market users on more carrier networks. Building on the launches to T-Mobile US and AT&T users in 2010, we’ve recently launched Direct Carrier Billing to users on three popular networks in Japan -- SoftBank, KDDI, and NTT DOCOMO.The momentum continues and today we’re excited to announce that Direct Carrier Billing is now available on Sprint. We've begun a phased roll-out of the service that will reach all users in the next few days. When complete, Android users on the Sprint network will be able to charge their Android Market purchases to their Sprint mobile bill with only a few clicks.We believe that Direct Carrier Billing is a key payment option because it lets users purchase and pay for apps more easily. It’s also important because it offers a convenient way to buy in regions where credit cards are less common.We are continuing to partner with more carriers around the world to offer carrier billing options to their subscribers. Watch for announcements of new payment options coming in the months ahead.

I think I’m having a Gene Amdahl moment (http://goo.gl/7v4kf)
Posted: 2011-04-07 11:32:07 UTC-07:00
[This post is by Andy Rubin, VP of Engineering —Tim Bray]Recently, there’s been a lot of misinformation in the press about Android and Google’s role in supporting the ecosystem. I’m writing in the spirit of transparency and in an attempt to set the record straight. The Android community has grown tremendously since the launch of the first Android device in October 2008, but throughout we’ve remained committed to fostering the development of an open platform for the mobile industry and beyond.We don’t believe in a “one size fits all” solution. The Android platform has already spurred the development of hundreds of different types of devices – many of which were not originally contemplated when the platform was first created. What amazes me is that even though the quantity and breadth of Android products being built has grown tremendously, it’s clear that quality and consistency continue to be top priorities. Miraculously, we are seeing the platform take on new use cases, features and form factors as it’s being introduced in new categories and regions while still remaining consistent and compatible for third party applications.As always, device makers are free to modify Android to customize any range of features for Android devices. This enables device makers to support the unique and differentiating functionality of their products. If someone wishes to market a device as Android-compatible or include Google applications on the device, we do require the device to conform with some basic compatibility requirements. (After all, it would not be realistic to expect Google applications – or any applications for that matter – to operate flawlessly across incompatible devices). Our “anti-fragmentation” program has been in place since Android 1.0 and remains a priority for us to provide a great user experience for consumers and a consistent platform for developers. In fact, all of the founding members of the Open Handset Alliance agreed not to fragment Android when we first announced it in 2007. Our approach remains unchanged: there are no lock-downs or restrictions against customizing UIs. There are not, and never have been, any efforts to standardize the platform on any single chipset architecture.Finally, we continue to be an open source platform and will continue releasing source code when it is ready. As I write this the Android team is still hard at work to bring all the new Honeycomb features to phones. As soon as this work is completed, we’ll publish the code. This temporary delay does not represent a change in strategy. We remain firmly committed to providing Android as an open source platform across many device types.The volume and variety of Android devices in the market continues to exceed even our most optimistic expectations. We will continue to work toward an open and healthy ecosystem because we truly believe this is best for the industry and best for consumers.

The IO Ticket Contest
Posted: 2011-04-03 13:20:39 UTC-07:00
When Google I/O sold out so fast, were kicking around ideas for how to get some of our ticket reserve into the hands of our favorite people: Dedicated developers. Someone floated the idea of a contest, so we had to pull one together double-quick. You can read the questions and first-round answers here.We thought you would enjoy some statistics, mostly rounded-off:- 2,800 people visited the contest page.
- 360 people tried answering the questions.
- 1 person got all six right.
- 200 people did well enough to get into Round 2.
- 70 people submitted apps.
- 38 of the apps worked well enough to be worth considering.
- 10 apps (exactly) got a “Nice” rating from the first-cut reviewer.
While we’re doing numbers, let’s investigate which of the Round-1 questions were hard. In decreasing order of difficulty, identified by correct answer, we find: Dalvik (97.5% correct), 160 (96%), Looper (58.5%), LLVM (57%),fyiWillBeAdvancedByHostKThx(43%), andPhoneNumberFormattingTextWatcher(19.5%).So, our thanks to the people who put in the work, and a particular tip of the hat to the deranged hackers er I mean creative developers who built three particularly-outstanding apps:First, to Kris Jurgowski, who pulled an all-nighter and wrote a nifty little app... on a Motorola CLIQ running Android 1.5! Next, to Heliodor Jalba, whose app had some gravity-warping extras and was less than 11K in size. And finally, to Charles Vaughn, whose app included a hilarious “Party Mode” that brought a smile to everyone’s face.

Identifying App Installations
Posted: 2011-03-30 14:18:08 UTC-07:00
[The contents of this post grew out of an internal discussion featuring many of the usual suspects who’ve been authors in this space. — Tim Bray]In the Android group, from time to time we hear complaints from developers about problems they’re having coming up with reliable, stable, unique device identifiers. This worries us, because we think that tracking such identifiers isn’t a good idea, and that there are better ways to achieve developers’ goals.Tracking Installations
It is very common, and perfectly reasonable, for a developer to want to track individual installations of their apps. It sounds plausible just to call TelephonyManager.getDeviceId() and use that value to identify the installation. There are problems with this: First, it doesn’t work reliably (see below). Second, when it does work, that value survives device wipes (“Factory resets”) and thus you could end up making a nasty mistake when one of your customers wipes their device and passes it on to another person.To track installations, you could for example use a UUID as an identifier, and simply create a new one the first time an app runs after installation. Here is a sketch of a class named “Installation” with one static methodInstallation.id(Context context). You could imagine writing more installation-specific data into theINSTALLATIONfile.public class Installation { private static String sID = null; private static final String INSTALLATION = "INSTALLATION"; public synchronized static String id(Context context) { if (sID == null) { File installation = new File(context.getFilesDir(), INSTALLATION); try { if (!installation.exists()) writeInstallationFile(installation); sID = readInstallationFile(installation); } catch (Exception e) { throw new RuntimeException(e); } } return sID; } private static String readInstallationFile(File installation) throws IOException { RandomAccessFile f = new RandomAccessFile(installation, "r"); byte[] bytes = new byte[(int) f.length()]; f.readFully(bytes); f.close(); return new String(bytes); } private static void writeInstallationFile(File installation) throws IOException { FileOutputStream out = new FileOutputStream(installation); String id = UUID.randomUUID().toString(); out.write(id.getBytes()); out.close(); } }Identifying Devices
Suppose you feel that for the needs of your application, you need an actual hardware device identifier. This turns out to be a tricky problem.In the past, when every Android device was a phone, things were simpler:TelephonyManager.getDeviceId()is required to return (depending on the network technology) the IMEI, MEID, or ESN of the phone, which is unique to that piece of hardware.However, there are problems with this approach:- Non-phones: Wifi-only devices or music players that don’t have telephony hardware just don’t have this kind of unique identifier.
- Persistence: On devices which do have this, it persists across device data wipes and factory resets. It’s not clear at all if, in this situation, your app should regard this as the same device.
- Privilege:It requires READ_PHONE_STATE permission, which is irritating if you don’t otherwise use or need telephony.
- Bugs: We have seen a few instances of production phones for which the implementation is buggy and returns garbage, for example zeros or asterisks.
Mac Address
It may be possible to retrieve a Mac address from a device’s WiFi or Bluetooth hardware. We do not recommend using this as a unique identifier. To start with, not all devices have WiFi. Also, if the WiFi is not turned on, the hardware may not report the Mac address.Serial Number
Since Android 2.3 (“Gingerbread”) this is available via android.os.Build.SERIAL. Devices without telephony are required to report a unique device ID here; some phones may do so also.ANDROID_ID
More specifically, Settings.Secure.ANDROID_ID. This is a 64-bit quantity that is generated and stored when the device first boots. It is reset when the device is wiped.ANDROID_ID seems a good choice for a unique device identifier. There are downsides: First, it is not 100% reliable on releases of Android prior to 2.2 (“Froyo”). Also, there has been at least one widely-observed bug in a popular handset from a major manufacturer, where every instance has the same ANDROID_ID.Conclusion
For the vast majority of applications, the requirement is to identify a particular installation, not a physical device. Fortunately, doing so is straightforward.There are many good reasons for avoiding the attempt to identify a particular device. For those who want to try, the best approach is probably the use of ANDROID_ID on anything reasonably modern, with some fallback heuristics for legacy devices.

In-app Billing Launched on Android Market
Posted: 2011-03-29 17:44:38 UTC-07:00
[This post is by Eric Chu, Android Developer Ecosystem. —Dirk Dougherty]Today, we're pleased to announce the launch of Android Market In-app Billing to developers and users. As an Android developer, you will now be able to publish apps that use In-app Billing and your users can make purchases from within your apps.In-app Billing gives you more ways to monetize your apps with try-and-buy, virtual goods, upgrades, and other billing models. If you aren’t yet familiar with In-app Billing, we encourage you to learn more about it.Several apps launching today are already using the service, including Tap Tap Revenge by Disney Mobile;Comics by ComiXology; Gun Bros, Deer Hunter Challenge HD, and WSOP3 by Glu Mobile; and Dungeon Defenders: FW Deluxe by Trendy Entertainment.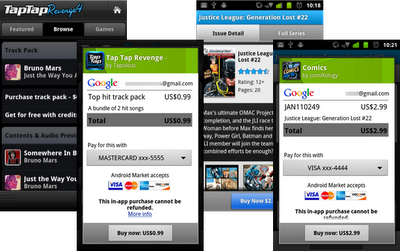
To try In-app Billing in your apps, start with the detailed documentation and complete sample appprovided, which show how to implement the service in your app, set up in-app product lists in Android Market, and test your implementation. Also, it’s absolutely essential that you review the security guidelines to make sure your billing implementation is secure.We look forward to seeing how you’ll use this new service in your apps!


In-App Billing on Android Market: Ready for Testing
Posted: 2011-03-24 13:26:29 UTC-07:00
[This post is by Eric Chu, Android Developer Ecosystem. —Dirk Dougherty]Back in January we announced our plan to introduce Android Market In-app Billing this quarter. We're pleased to let you know that we will be launching In-app Billing next week.In preparation for the launch, we are opening up Android Market for upload and end-to-end testing of your apps that use In-app Billing. You can now upload your apps to the Developer Console, create a catalog of in-app products, and set prices for them. You can then set up accounts to test in-app purchases. During these test transactions, the In-app Billing service interacts with your app exactly as it will for actual users and live transactions.Note that although you can upload apps during this test development phase, you won’t be able to actually publish the apps to users until the full launch of the service next week.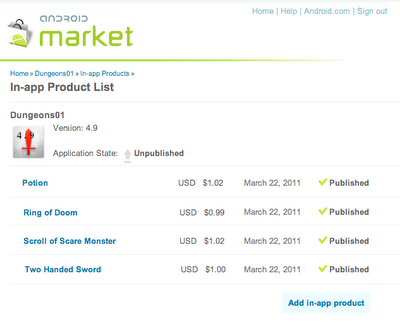
To get you started, we’ve updated the developer documentation with information about how to set up product lists and test your in-app products. Also, it is absolutely essential that you review the security guidelines to make sure your billing implementation is secure.We encourage you start uploading and testing your apps right away.

Memory Analysis for Android Applications
Posted: 2011-03-24 12:03:01 UTC-07:00

[This post is by Patrick Dubroy, an Android engineer who writes about programming, usability, and interaction on his personal blog. — Tim Bray]The Dalvik runtime may be garbage-collected, but that doesn't mean you can ignore memory management. You should be especially mindful of memory usage on mobile devices, where memory is more constrained. In this article, we're going to take a look at some of the memory profiling tools in the Android SDK that can help you trim your application's memory usage.Some memory usage problems are obvious. For example, if your app leaks memory every time the user touches the screen, it will probably trigger anOutOfMemoryErroreventually and crash your app. Other problems are more subtle, and may just degrade the performance of both your app (as garbage collections are more frequent and take longer) and the entire system.Tools of the trade
The Android SDK provides two main ways of profiling the memory usage of an app: the Allocation Tracker tab in DDMS, and heap dumps. The Allocation Tracker is useful when you want to get a sense of what kinds of allocation are happening over a given time period, but it doesn't give you any information about the overall state of your application's heap. For more information about the Allocation Tracker, see the article onTracking Memory Allocations. The rest of this article will focus on heap dumps, which are a more powerful memory analysis tool.A heap dump is a snapshot of an application's heap, which is stored in a binary format called HPROF. Dalvik uses a format that is similar, but not identical, to the HPROF tool in Java. There are a few ways to generate a heap dump of a running Android app. One way is to use the Dump HPROF file button in DDMS. If you need to be more precise about when the dump is created, you can also create a heap dump programmatically by using theandroid.os.Debug.dumpHprofData()function.To analyze a heap dump, you can use a standard tool like jhat or the Eclipse Memory Analyzer (MAT). However, first you'll need to convert the .hprof file from the Dalvik format to the J2SE HPROF format. You can do this using thehprof-convtool provided in the Android SDK. For example:hprof-conv dump.hprof converted-dump.hprofExample: Debugging a memory leak
In the Dalvik runtime, the programmer doesn't explicitly allocate and free memory, so you can't really leak memory like you can in languages like C and C++. A "memory leak" in your code is when you keep a reference to an object that is no longer needed. Sometimes a single reference can prevent a large set of objects from being garbage collected.Let's walk through an example using the Honeycomb Gallery sample app from the Android SDK. It's a simple photo gallery application that demonstrates how to use some of the new Honeycomb APIs. (To build and download the sample code, see the instructions.) We're going to deliberately add a memory leak to this app in order to demonstrate how it could be debugged.
Imagine that we want to modify this app to pull images from the network. In order to make it more responsive, we might decide to implement a cache which holds recently-viewed images. We can do that by making a few small changes to ContentFragment.java. At the top of the class, let's add a new static variable:private static HashMap<String,Bitmap> sBitmapCache = new HashMap<String,Bitmap>();This is where we'll cache the Bitmaps that we load. Now we can change theupdateContentAndRecycleBitmap()method to check the cache before loading, and to add Bitmaps to the cache after they're loaded.void updateContentAndRecycleBitmap(int category, int position) { if (mCurrentActionMode != null) { mCurrentActionMode.finish(); } // Get the bitmap that needs to be drawn and update the ImageView. // Check if the Bitmap is already in the cache String bitmapId = "" + category + "." + position; mBitmap = sBitmapCache.get(bitmapId); if (mBitmap == null) { // It's not in the cache, so load the Bitmap and add it to the cache. // DANGER! We add items to this cache without ever removing any. mBitmap = Directory.getCategory(category).getEntry(position) .getBitmap(getResources()); sBitmapCache.put(bitmapId, mBitmap); } ((ImageView) getView().findViewById(R.id.image)).setImageBitmap(mBitmap); }I've deliberately introduced a memory leak here: we add Bitmaps to the cache without ever removing them. In a real app, we'd probably want to limit the size of the cache in some way.Examining heap usage in DDMS
The Dalvik Debug Monitor Server (DDMS) is one of the primary Android debugging tools. DDMS is part of theADT Eclipse plug-in, and a standalone version can also be found in thetools/directory of the Android SDK. For more information on DDMS, see Using DDMS.Let's use DDMS to examine the heap usage of this app. You can start up DDMS in one of two ways:- from Eclipse: click Window > Open Perspective > Other... > DDMS
- or from the command line: run
ddms(or./ddmson Mac/Linux) in thetools/directory

Select the processcom.example.android.hcgalleryin the left pane, and then click the Show heap updates button in the toolbar. Then, switch to the VM Heap tab in DDMS. It shows some basic stats about our heap memory usage, updated after every GC. To see the first update, click the Cause GC button.
We can see that our live set (the Allocated column) is a little over 8MB. Now flip through the photos, and watch that number go up. Since there are only 13 photos in this app, the amount of memory we leak is bounded. In some ways, this is the worst kind of leak to have, because we never get anOutOfMemoryErrorindicating that we are leaking.Creating a heap dump
Let's use a heap dump to track down the problem. Click the Dump HPROF file button in the DDMS toolbar, choose where you want to save the file, and then runhprof-convon it. In this example, I'll be using the standalone version of MAT (version 1.0.1), available from the MAT download site.If you're running ADT (which includes a plug-in version of DDMS) and have MAT installed in Eclipse as well, clicking the “dump HPROF” button will automatically do the conversion (using hprof-conv) and open the converted hprof file into Eclipse (which will be opened by MAT).Analyzing heap dumps using MAT
Start up MAT and load the converted HPROF file we just created. MAT is a powerful tool, and it's beyond the scope of this article to explain all it's features, so I'm just going to show you one way you can use it to detect a leak: the Histogram view. The Histogram view shows a list of classes sortable by the number of instances, theshallow heap (total amount of memory used by all instances), or the retained heap (total amount of memory kept alive by all instances, including other objects that they have references to).
If we sort by shallow heap, we can see that instances ofbyte[]are at the top. As of Android 3.0 (Honeycomb), the pixel data for Bitmap objects is stored in byte arrays (previously it was not stored in the Dalvik heap), and based on the size of these objects, it's a safe bet that they are the backing memory for our leaked bitmaps.Right-click on thebyte[]class and select List Objects > with incoming references. This produces a list of all byte arrays in the heap, which we can sort based on Shallow Heap usage.Pick one of the big objects, and drill down on it. This will show you the path from the root set to the object -- the chain of references that keeps this object alive. Lo and behold, there's our bitmap cache!
MAT can't tell us for sure that this is a leak, because it doesn't know whether these objects are needed or not -- only the programmer can do that. In this case, the cache is using a large amount of memory relative to the rest of the application, so we might consider limiting the size of the cache.Comparing heap dumps with MAT
When debugging memory leaks, sometimes it's useful to compare the heap state at two different points in time. To do this, you'll need to create two separate HPROF files (don't forget to convert them usinghprof-conv).Here's how you can compare two heap dumps in MAT (it's a little complicated):- Open the first HPROF file (using File > Open Heap Dump).
- Open the Histogram view.
- In the Navigation History view (use Window > Navigation History if it's not visible), right click on histogramand select Add to Compare Basket.
- Open the second HPROF file and repeat steps 2 and 3.
- Switch to the Compare Basket view, and click Compare the Results (the red "!" icon in the top right corner of the view).
Conclusion
In this article, I've shown how the Allocation Tracker and heap dumps can give you get a better sense of your application's memory usage. I also showed how The Eclipse Memory Analyzer (MAT) can help you track down memory leaks in your app. MAT is a powerful tool, and I've only scratched the surface of what you can do with it. If you'd like to learn more, I recommend reading some of these articles:- Memory Analyzer News: The official blog of the Eclipse MAT project
- Markus Kohler's Java Performance blog has many helpful articles, including Analysing the Memory Usage of Android Applications with the Eclipse Memory Analyzer and 10 Useful Tips for the Eclipse Memory Analyzer.


Application Stats on Android Market
Posted: 2011-03-17 10:21:04 UTC-07:00
[This post is by Eric Chu, Android Developer Ecosystem. —Dirk Dougherty]On the Android Market team, it’s been our goal to bring you improved ways of seeing and understanding the installation performance of your published applications. We know that this information is critical in helping you tune your development and marketing efforts. Today I’m pleased to let you know about an important new feature that we’ve added to Android Market called Application Statistics.Application Statistics is a new type of dashboard in the Market Developer Console that gives you an overview of the installation performance of your apps. It provides charts and tables that summarize each app’s active installation trend over time, as well as its distribution across key dimensions such as Android platform versions, devices, user countries, and user languages. For additional context, the dashboard also shows the comparable aggregate distribution for all app installs from Android Market (numbering in the billions). You could use this data to observe how your app performs relative to the rest of Market or decide what to develop next.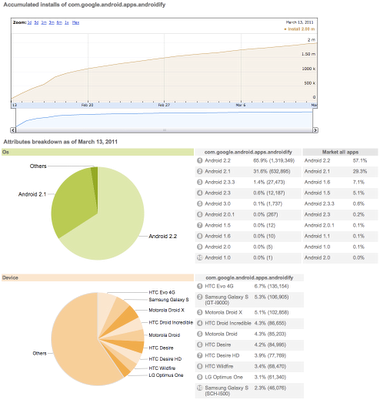
To start with, we’ve seeded the application Statistics dashboards with data going back to December 22, 2010. Going forward, we’ll be updating the data daily.We encourage you to check out these new dashboards and we hope they’ll give you new and useful insights into your apps’ installation performance. You can access the Statistics dashboards from the main Listings page in the Developer Console.Watch for more announcements soon. We are continuing to work hard to deliver more reporting features to help you manage your products successfully on Android Market.


Android 3.0 Hardware Acceleration
Posted: 2011-03-16 09:47:57 UTC-07:00

[This post is by Romain Guy, who likes things on your screen to move fast. —Tim Bray]One of the biggest changes we made to Android in this release is the addition of a new rendering pipeline so that applications can benefit from hardware accelerated 2D graphics. Hardware accelerated graphics is nothing new to the Android platform, it has always been used for windows composition or OpenGL games for instance, but with this new rendering pipeline applications can benefit from an extra boost in performance. On a Motorola Xoom device, all the standard applications like Browser and Calendar use hardware-accelerated 2D graphics.In this article, I will show you how to enable the hardware accelerated 2D graphics pipeline in your application and give you a few tips on how to use it properly.Go faster
To enable the hardware accelerated 2D graphics, open yourAndroidManifest.xmlfile and add the following attribute to the<application />tag:android:hardwareAccelerated="true"If your application uses only standard widgets and drawables, this should be all you need to do. Once hardware acceleration is enabled, all drawing operations performed on a View's Canvas are performed using the GPU.If you have custom drawing code you might need to do a bit more, which is in part why hardware acceleration is not enabled by default. And it's why you might want to read the rest of this article, to understand some of the important details of acceleration.Controlling hardware acceleration
Because of the characteristics of the new rendering pipeline, you might run into issues with your application. Problems usually manifest themselves as invisible elements, exceptions or different-looking pixels. To help you, Android gives you 4 different ways to control hardware acceleration. You can enable or disable it on the following elements:- Application
- Activity
- Window
- View
To enable or disable hardware acceleration at the application or activity level, use the XML attribute mentioned earlier. The following snippet enables hardware acceleration for the entire application but disables it for one activity:<application android:hardwareAccelerated="true"> <activity ... /> <activity android:hardwareAccelerated="false" /> </application>If you need more fine-grained control, you can enable hardware acceleration for a given window at runtime:getWindow().setFlags( WindowManager.LayoutParams.FLAG_HARDWARE_ACCELERATED, WindowManager.LayoutParams.FLAG_HARDWARE_ACCELERATED);Note that you currently cannot disable hardware acceleration at the window level. Finally, hardware acceleration can be disabled on individual views:view.setLayerType(View.LAYER_TYPE_SOFTWARE, null);Layer types have many other usages that will be described later.Am I hardware accelerated?
It is sometimes useful for an application, or more likely a custom view, to know whether it currently is hardware accelerated. This is particularly useful if your application does a lot of custom drawing and not all operations are properly supported by the new rendering pipeline.There are two different ways to check whether the application is hardware accelerated:View.isHardwareAccelerated(), returns true if the View is attached to a hardware accelerated windowCanvas.isHardwareAccelerated(), returns true if the Canvas is hardware accelerated
If you must do this check in your drawing code, it is highly recommended to useCanvas.isHardwareAccelerated()instead ofView.isHardwareAccelerated(). Indeed, even when a View is attached to a hardware accelerated window, it can be drawn using a non-hardware accelerated Canvas. This happens for instance when drawing a View into a bitmap for caching purpose.What drawing operations are supported?
The current hardware accelerated 2D pipeline supports the most commonly used Canvas operations, and then some. We implemented all the operations needed to render the built-in applications, all the default widgets and layouts, and common advanced visual effects (reflections, tiled textures, etc.) There are however a few operations that are currently not supported, but might be in a future version of Android:- Canvas
clipPathclipRegiondrawPicturedrawPointsdrawPosTextdrawTextOnPathdrawVertices
- Paint
setLinearTextsetMaskFiltersetRasterizer
In addition, some operations behave differently when hardware acceleration enabled:- Canvas
clipRect:XOR,DifferenceandReverseDifferenceclip modes are ignored; 3D transforms do not apply to the clip rectangledrawBitmapMesh: colors array is ignoreddrawLines: anti-aliasing is not supportedsetDrawFilter: can be set, but ignored
- Paint
setDither: ignoredsetFilterBitmap: filtering is always onsetShadowLayer: works with text only
- ComposeShader
- A
ComposeShadercan only contain shaders of different types (aBitmapShaderand aLinearGradientShaderfor instance, but not two instances ofBitmapShader) - A
ComposeShadercannot contain aComposeShader
- A
If drawing code in one of your views is affected by any of the missing features or limitations, you don't have to miss out on the advantages of hardware acceleration for your overall application. Instead, consider rendering the problematic view into a bitmap or setting its layer type toLAYER_TYPE_SOFTWARE. In both cases, you will switch back to the software rendering pipeline.Dos and don'ts
Switching to hardware accelerated 2D graphics is a great way to get smoother animations and faster rendering in your application but it is by no means a magic bullet. Your application should be designed and implemented to be GPU friendly. It is easier than you might think if you follow these recommendations:- Reduce the number of Views in your application: the more Views the system has to draw, the slower it will be. This applies to the software pipeline as well; it is one of the easiest ways to optimize your UI.
- Avoid overdraw: always make sure that you are not drawing too many layers on top of each other. In particular, make sure to remove any Views that are completely obscured by other opaque views on top of it. If you need to draw several layers blended on top of each other consider merging them into a single one. A good rule of thumb with current hardware is to not draw more than 2.5 times the number of pixels on screen per frame (and transparent pixels in a bitmap count!)
- Don't create render objects in draw methods: a common mistake is to create a new Paint, or a new Path, every time a rendering method is invoked. This is not only wasteful, forcing the system to run the GC more often, it also bypasses caches and optimizations in the hardware pipeline.
- Don't modify shapes too often: complex shapes, paths and circles for instance, are rendered using texture masks. Every time you create or modify a Path, the hardware pipeline must create a new mask, which can be expensive.
- Don't modify bitmaps too often: every time you change the content of a bitmap, it needs to be uploaded again as a GPU texture the next time you draw it.
- Use alpha with care: when a View is made translucent using
View.setAlpha(), anAlphaAnimationor anObjectAnimatoranimating the “alpha” property, it is rendered in an off-screen buffer which doubles the required fill-rate. When applying alpha on very large views, consider setting the View's layer type toLAYER_TYPE_HARDWARE.
View layers
Since Android 1.0, Views have had the ability to render into off-screen buffers, either by using a View's drawing cache, or by usingCanvas.saveLayer(). Off-screen buffers, or layers, have several interesting usages. They can be used to get better performance when animating complex Views or to apply composition effects. For instance, fade effects are implemented by usingCanvas.saveLayer()to temporarily render a View into a layer and then compositing it back on screen with an opacity factor.Because layers are so useful, Android 3.0 gives you more control on how and when to use them. To to so, we have introduced a new API calledView.setLayerType(int type, Paint p). This API takes two parameters: the type of layer you want to use and an optional Paint that describes how the layer should be composited. The paint parameter may be used to apply color filters, special blending modes or opacity to a layer. A View can use one of 3 layer types:LAYER_TYPE_NONE: the View is rendered normally, and is not backed by an off-screen buffer.LAYER_TYPE_HARDWARE: the View is rendered in hardware into a hardware texture if the application is hardware accelerated. If the application is not hardware accelerated, this layer type behaves the same asLAYER_TYPE_SOFTWARE.LAYER_TYPE_SOFTWARE: the View is rendered in software into a bitmap
The type of layer you will use depends on your goal:- Performance: use a hardware layer type to render a View into a hardware texture. Once a View is rendered into a layer, its drawing code does not have to be executed until the View calls
invalidate(). Some animations, for instance alpha animations, can then be applied directly onto the layer, which is very efficient for the GPU to do. - Visual effects: use a hardware or software layer type and a Paint to apply special visual treatments to a View. For instance, you can draw a View in black and white using a
ColorMatrixColorFilter. - Compatibility: use a software layer type to force a View to be rendered in software. This is an easy way to work around limitations of the hardware rendering pipeline.
Layers and animations
Hardware-accelerated 2D graphics help deliver a faster and smoother user experience, especially when it comes to animations. Running an animation at 60 frames per second is not always possible when animating complex views that issue a lot of drawing operations. If you are running an animation in your application and do not obtain the smooth results you want, consider enabling hardware layers on your animated views.When a View is backed by a hardware layer, some of its properties are handled by the way the layer is composited on screen. Setting these properties will be efficient because they do not require the view to be invalidated and redrawn. Here is the list of properties that will affect the way the layer is composited; calling the setter for any of these properties will result in optimal invalidation and no redraw of the targeted View:alpha: to change the layer's opacityx,y,translationX,translationY: to change the layer's positionscaleX,scaleY: to change the layer's sizerotation,rotationX,rotationY: to change the layer's orientation in 3D spacepivotX,pivotY: to change the layer's transformations origin
These properties are the names used when animating a View with anObjectAnimator. If you want to set/get these properties, call the appropriate setter or getter. For instance, to modify the alpha property, callsetAlpha(). The following code snippet shows the most efficient way to rotate a View in 3D around the Y axis:view.setLayerType(View.LAYER_TYPE_HARDWARE, null); ObjectAnimator.ofFloat(view, "rotationY", 180).start();Since hardware layers consume video memory, it is highly recommended you enable them only for the duration of the animation. This can be achieved with animation listeners:view.setLayerType(View.LAYER_TYPE_HARDWARE, null); ObjectAnimator animator = ObjectAnimator.ofFloat( view, "rotationY", 180); animator.addListener(new AnimatorListenerAdapter() { @Override public void onAnimationEnd(Animator animation) { view.setLayerType(View.LAYER_TYPE_NONE, null); } }); animator.start();New drawing model
Along with hardware-accelerated 2D graphics, Android 3.0 introduces another major change in the UI toolkit’s drawing model: display lists, which are only enabled when hardware acceleration is turned on. To fully understand display lists and how they may affect your application it is important to also understand how Views are drawn.Whenever an application needs to update a part of its UI, it invokesinvalidate()(or one of its variants) on any View whose content has changed. The invalidation messages are propagated all the way up the view hierarchy to compute the dirty region; the region of the screen that needs to be redrawn. The system then draws any View in the hierarchy that intersects with the dirty region. The drawing model is therefore made of two stages:- Invalidate the hierarchy
- Draw the hierarchy
There are unfortunately two drawbacks to this approach. First, this drawing model requires execution of a lot of code on every draw pass. Imagine for instance your application callsinvalidate()on a button and that button sits on top of a more complex View like aMapView. When it comes time to draw, the drawing code of theMapViewwill be executed even though theMapViewitself has not changed.The second issue with that approach is that it can hide bugs in your application. Since views are redrawn anytime they intersect with the dirty region, a View whose content you changed might be redrawn even thoughinvalidate()was not called on it. When this happens, you are relying on another View getting invalidated to obtain the proper behavior. Needless to say, this behavior can change every time you modify your application ever so slightly. Remember this rule: always callinvalidate()on a View whenever you modify data or state that affects this View’s drawing code. This applies only to custom code since setting standard properties, like the background color or the text in aTextView, will causeinvalidate()to be called properly internally.Android 3.0 still relies oninvalidate()to request screen updates anddraw()to render views. The difference is in how the drawing code is handled internally. Rather than executing the drawing commands immediately, the UI toolkit now records them inside display lists. This means that display lists do not contain any logic, but rather the output of the view hierarchy’s drawing code. Another interesting optimization is that the system only needs to record/update display lists for views marked dirty by aninvalidate()call; views that have not been invalidated can be redrawn simply by re-issuing the previously recorded display list. The new drawing model now contains 3 stages:- Invalidate the hierarchy
- Record/update display lists
- Draw the display lists
With this model, you cannot rely on a View intersecting the dirty region to have itsdraw()method executed anymore: to ensure that a View’s display list will be recorded, you must callinvalidate(). This kind of bug becomes very obvious with hardware acceleration turned on and is easy to fix: you would see the previous content of a View after changing it.Using display lists also benefits animation performance. In the previous section, we saw that setting specific properties (alpha, rotation, etc.) does not require invalidating the targeted View. This optimization also applies to views with display lists (any View when your application is hardware accelerated.) Let’s imagine you want to change the opacity of aListViewembedded inside aLinearLayout, above aButton. Here is what the (simplified) display list of theLinearLayoutlooks like before changing the list’s opacity:DrawDisplayList(ListView) DrawDisplayList(Button)After invokinglistView.setAlpha(0.5f)the display list now contains this:SaveLayerAlpha(0.5) DrawDisplayList(ListView) Restore DrawDisplayList(Button)The complex drawing code ofListViewwas not executed. Instead the system only updated the display list of the much simplerLinearLayout. In previous versions of Android, or in an application without hardware acceleration enabled, the drawing code of both the list and its parent would have to be executed again.It’s your turn
Enabling hardware accelerated 2D graphics in your application is easy, particularly if you rely solely on standard views and drawables. Just keep in mind the few limitations and potential issues described in this document and make sure to thoroughly test your application!


Renderscript Part 2
Posted: 2011-03-10 16:18:59 UTC-08:00

[This post is by R. Jason Sams, an Android engineer who specializes in graphics, performance tuning, and software architecture. —Tim Bray]In Introducing Renderscript I gave a brief overview of this technology. In this post I’ll look at “compute” in more detail. In Renderscript we use “compute” to mean offloading of data processing from Dalvik code to Renderscript code which may run on the same or different processor(s).Renderscript’s Design Goals
Renderscript has three primary goals, given here from most to least important.Portability: Application code needs to be able to run across all devices, even those with radically different hardware. ARM currently comes in several variants — with and without VFP, with and without NEON, and with various register counts. Beyond ARM, there are other CPU architectures like x86, several GPU architectures, and even more DSP architectures.Performance: The second objective is to get as much performance as possible within the constraints of Portability. For Renderscript to make sense we need to achieve much greater performance than established solutions.Usability: The third goal is to simplify development as much as possible. Where possible we automate steps to avoid glue code and other developer busy work.Those three goals lead to several design trade-offs. It’s these trade-offs that separate Renderscript from the existing approaches on the device, such as Dalvik or the NDK. They should be thought of as different tools intended to solve different problems.Core Design Choices
The first choice that needed to be made is what language should be used. When it comes to languages there are almost unlimited options. Shading style languages, C, and C++ were considered. In the end the shading style languages were ruled out due to the need to be able to manipulate data structures for graphical applications such as scene graphs. The lack of pointers and recursion were considered crippling limitations for usability. C++ on the other hand was very desirable but ran into issues with portability. The advanced C++ features are very difficult to run on non-cpu hardware. In the end we chose to base Renderscript on C99 because it offers equal performance to the other choices, is very well understood by developers, and poses no issues running on a wide range of hardware.The next design trade-off was work flow. Specifically we focused on how to convert source code to machine code. We explored several options and actually implemented two different solutions during the development of Renderscript. The older versions (Eclair through Gingerbread) compiled the C source code all the way to machine code on the device. While this had some nice properties such as the ability for applications to generate source on the fly it turned out to be a usability problem. Having to compile your app, install it, run it, then find your syntax error was painful. Also the weaker CPU in devices limited the static analysis and scope of optimizations that could be done.Then we switched to LLVM, moving to a model where scripts are compiled and analyzed on the host using a modified version of clang. We perform high level optimizations at this stage, then emit LLVM bitcode. The translation of the intermediate bitcode to machine code still happens on the device (along with additional device-specific optimizations).Our last big trade-off for compute was thread launching. The trade-off here is between performance and portability. Given sufficient knowledge, existing compute solutions allow a developer to tune an application for a specific hardware platform to the detriment of others. Given unlimited time and resources developers could tune for every hardware combination. While testing and tuning a variety of devices is never bad, no amount of work allows them to tune for unreleased hardware they don’t yet have. A more portable solution places the tuning burden on the runtime, providing greater average performance at the cost of peak performance. Given that the number one goal was portability we chose to place this burden on the runtime.A secondary effect of choosing runtime thread-launch management is that dynamic decisions can be made about where to run a script. For example, some compute hardware can support pointers and recursion while others cannot. We could have chosen to disallow these things and give developers a lowest common denominator API, but we chose to instead let the runtime analyze the scripts. This allows developers to get full use of hardware that supports these features, since there is always a fully featured CPU to fall back upon. In the end, developers can focus on writing good apps and the hardware manufacturers can compete on making the most fully featured and efficient hardware. As new features appear, applications will benefit without application code changes.Usability was a major driver in Renderscript’s design. Most existing compute and graphics platforms require elaborate glue logic to tie the high performance code back to the core application code. This code is very bug prone and usually painful to write. The static analysis we do in the host Renderscript compiler is helpful in solving this issue. Each user script generates a Dalvik “glue” class. Names for the glue class and its accessors are derived from the contents of the script. This greatly simplifies the use of the scripts from Dalvik.Example: The Application Level
Given these trade-offs, what does a simple compute application look like? In this very basic example we will take a normal android.graphics.Bitmap object and run a script that copies it to a second bitmap, converting it to monochrome along the way. Let’s look at the application code which invokes the script before we look at the script itself; this comes from the HelloCompute SDK sample:private Bitmap mBitmapIn; private Bitmap mBitmapOut; private RenderScript mRS; private Allocation mInAllocation; private Allocation mOutAllocation; private ScriptC_mono mScript; private void createScript() { mRS = RenderScript.create(this); mInAllocation = Allocation.createFromBitmap(mRS, mBitmapIn, Allocation.MipmapControl.MIPMAP_NONE, Allocation.USAGE_SCRIPT); mOutAllocation = Allocation.createTyped(mRS, mInAllocation.getType()); mScript = new ScriptC_mono(mRS, getResources(), R.raw.mono); mScript.set_gIn(mInAllocation); mScript.set_gOut(mOutAllocation); mScript.set_gScript(mScript); mScript.invoke_filter(); mOutAllocation.copyTo(mBitmapOut); }This function assumes that the two bitmaps have already been created and are of the same size and format.The first thing all Renderscript applications need is a context object. This is the core object used to create and manage all other Renderscript objects. This first line of the function creates the object,mRS. This object must be kept alive for the duration the application intends to use it or any objects created with it.The next two function calls create compute allocations from the Bitmaps. Renderscript has its own memory allocator, because the memory may potentially be shared by multiple processors and possibly exist in more than one memory space. When an allocation is created its potential uses need to be enumerated so the system may choose the correct type of memory for its intended uses.The first functioncreateFromBitmap()creates a matching Renderscript allocation object and copies the contents of the bitmap into the allocation. Allocations are the basic units of memory used in renderscript. The second Allocation created withcreateTyped()generates an Allocation identical in structure to the first. The definition of that structure is retrieved from the first with thegetType()query. Renderscript types define the structure of an Allocation. In this case the type was generated from the height, width, and format of the incoming bitmap.The next line loads the script, which is named “mono.rs”.R.raw.monoidentifies it; scripts are stored as raw resources in an application’s APK. Note the name of the auto-generated “glue” class,ScriptC_mono.The next three lines set properties of the script, using generated methods in the “glue” class.Now we have everything set up. The functioninvoke_filter()actually does some work for us. This causes the functionfilter()in the script to be called. If the function had parameters they could be passed here. Return values are not allowed as invocations are asynchronous.The last line of the function copies the result of our compute script back to the managed bitmap; it has the necessary synchronization code built-in to ensure the script has completed running.Example: The Script
Here’s the Renderscript stored in mono.rs which the application code above invokes:#pragma version(1) #pragma rs java_package_name(com.android.example.hellocompute) rs_allocation gIn; rs_allocation gOut; rs_script gScript; const static float3 gMonoMult = {0.299f, 0.587f, 0.114f}; void root(const uchar4 *v_in, uchar4 *v_out, const void *usrData, uint32_t x, uint32_t y) { float4 f4 = rsUnpackColor8888(*v_in); float3 mono = dot(f4.rgb, gMonoMult); *v_out = rsPackColorTo8888(mono); } void filter() { rsForEach(gScript, gIn, gOut, 0); }The first line is simply an indication to the compiler which revision of the native Renderscript API the script is written against. The second line controls the package association of the generated reflected code.The three globals listed correspond to the globals which were set up in our managed code. The fourth global is not reflected because it is marked as static. Non-static, const, globals are also allowed but only generate a get reflected method. This can be useful for keeping constants in sync between scripts and managed code.The functionroot()is special to renderscript. Conceptually it’s similar tomain()in C. When a script is invoked by the runtime, this is the function that will be called. In this case the parameters are the incoming and outgoing pixels from our allocation. A generic user pointer is also provided along with the address within the allocation that this invocation is processing. This example ignores these parameters.The three lines of the root function unpack the pixel from RGBA_8888 to a vector of four floats. The second line uses a built-in math function to compute the dot product of the monochrome constants with the incoming pixel data to get our grey level. Note that while dot returns a single float it can be assigned to a float3 which simply copies the value to each of the x, y, and z components of the float3. In the end we use another builtin to repack the floats back to a 32 bit pixel. This is also an example of an overloaded function as there are separate versions ofrsPackColorTo8888which take RGB (float3) or RGBA (float4) data. If A is not provided the overloaded functions assume a value of 1.0f.Thefilter()function is called from managed code to do the conversion. It simply does a compute launch on each element of the allocation. The first parameter is the script to be launched - the root function of this script will be invoked for each element in the allocation. The second and third parameters are the input and output data allocations. The last parameter is the pointer for the user data if we desired to pass additional information to the root function.The forEach will launch across multiple threads if the device has multiple processors. In the future forEach can provide a transition point where control may pass from one processor to another. In this example it is reasonable to expect that in the future filter() would get executed on the CPU and root() would occur on a GPU or DSP.I hope this gives glimpse into the design behind Renderscript and a simple example of how it can be used.


Fragments For All
Posted: 2011-03-03 14:10:23 UTC-08:00
[This post is by Xavier Ducrohet, Android SDK Tech Lead. — Tim Bray]A few weeks ago, Dianne Hackborn wrote about the new Fragments API, a mechanism that makes it easier for applications to scale across a variety of screen sizes.However, as Dianne noted, this new API, which is part of Honeycomb, does not help developers whose applications target earlier versions of Android.Today we’ve released a static library that exposes the same Fragments API (as well as the newLoaderManager and a few other classes) so that applications compatible with Android 1.6 or later can use fragments to create tablet-compatible user interfaces.This library is available through the SDK Updater; it’s called “Android Compatibility package”.

Heading for GDC
Posted: 2011-02-27 14:47:26 UTC-08:00
[This post is by Chris Pruett, who writes regularly about games here, and is obviously pretty cranked about this conference. — Tim Bray]Android will descend in force upon the Game Developers Conference in San Francisco this week; we’re offering a full day packed with sessions covering everything you need to know to build games on Android.
From 10 AM to 5 PM on Tuesday the 1st, North Hall Room 121 will be ground zero for Android Developer Day, with five engineering-focused sessions on everything from compatibility to native audio and graphics. Here's a quick overview; there’s more on the Game Developer Conference site:- Building Aggressively Compatible Android Games — Chris Pruett
- C++ On Android Just Got Better: The New NDK — Daniel Galpin and Ian Ni-Lewis
- OpenGL ES 2.0 on Android: Building Google Body — Nico Weber
- Android Native Audio — Glenn Kasten and Jean-Michel Trivi
- Evading Pirates and Stopping Vampires Using License Server, In App Billing, and AppEngine — Daniel Galpin and Trevor Johns
Our crack team of engineers and advocates spend their nights devising new ways to bring high-end game content to Android, and a full day of sessions just wasn't enough to appease them. So in addition, you can find incisive Android insight in other tracks:- REPLICA ISLAND: Building a Successful Android Game — Chris Pruett (1:45 PM Monday, Smartphone Summit)
- Publishing Games Through Android Market — Eric Chu (1:30 PM Wednesday, Main Track)
Finally, you can visit us in the Google booth on the GDC Expo floor; stop by, fondle the latest devices, and check out the awesome games that are already running on them. We're foaming at the mouth with excitement about the Game Developers Conference next week, and you should be too.Hope to see you there!


Animation in Honeycomb
Posted: 2011-02-24 14:54:21 UTC-08:00

[This post is by Chet Haase, an Android engineer who specializes in graphics and animation, and who occasionally posts videos and articles on these topics on his CodeDependent blog at graphics-geek.blogspot.com. — Tim Bray]One of the new features ushered in with the Honeycomb release is a new animation system, a set of APIs in a whole new package (android.animation) that makes animating objects and properties much easier than it was before."But wait!" you blurt out, nearly projecting a mouthful of coffee onto your keyboard while reading this article, "Isn't there already an animation system in Android?"Animation Prior to Honeycomb
Indeed, Android already has animation capabilities: there are several classes and lots of great functionality in theandroid.view.animationpackage. For example, you can move, scale, rotate, and fade Views and combine multiple animations together in anAnimationSetobject to coordinate them. You can specify animations in aLayoutAnimationControllerto get automatically staggered animation start times as a container lays out its child views. And you can use one of the manyInterpolatorimplementations likeAccelerateInterpolatorandBounceto get natural, nonlinear timing behavior.But there are a couple of major pieces of functionality lacking in the previous system.For one thing, you can animate Views... and that's it. To a great extent, that's okay. The GUI objects in Android are, after all, Views. So as long as you want to move a Button, or a TextView, or a LinearLayout, or any other GUI object, the animations have you covered. But what if you have some custom drawing in your view that you'd like to animate, like the position of a Drawable, or the translucency of its background color? Then you're on your own, because the previous animation system only understands how to manipulate View objects.The previous animations also have a limited scope: you can move, rotate, scale, and fade a View... and that's it. What about animating the background color of a View? Again, you're on your own, because the previous animations had a hard-coded set of things they were able to do, and you could not make them do anything else.Finally, the previous animations changed the visual appearance of the target objects... but they didn't actually change the objects themselves. You may have run into this problem. Let's say you want to move a Button from one side of the screen to the other. You can use aTranslateAnimationto do so, and the button will happily glide along to the other side of the screen. And when the animation is done, it will gladly snap back into its original location. So you find thesetFillAfter(true)method onAnimationand try it again. This time the button stays in place at the location to which it was animated. And you can verify that by clicking on it - Hey! How come the button isn't clicking? The problem is that the animation changes where the button is drawn, but not where the button physically exists within the container. If you want to click on the button, you'll have to click the location that it used to live in. Or, as a more effective solution (and one just a tad more useful to your users), you'll have to write your code to actually change the location of the button in the layout when the animation finishes.It is for these reasons, among others, that we decided to offer a new animation system in Honeycomb, one built on the idea of "property animation."Property Animation in Honeycomb
The new animation system in Honeycomb is not specific to Views, is not limited to specific properties on objects, and is not just a visual animation system. Instead, it is a system that is all about animating values over time, and assigning those values to target objects and properties - any target objects and properties. So you can move a View or fade it in. And you can move a Drawable inside a View. And you can animate the background color of a Drawable. In fact, you can animate the values of any data structure; you just tell the animation system how long to run for, how to evaluate between values of a custom type, and what values to animate between, and the system handles the details of calculating the animated values and setting them on the target object.Since the system is actually changing properties on target objects, the objects themselves are changed, not simply their appearance. So that button you move is actually moved, not just drawn in a different place. You can even click it in its animated location. Go ahead and click it; I dare you.I'll walk briefly through some of the main classes at work in the new system, showing some sample code when appropriate. But for a more detailed view of how things work, check out the API Demos in the SDK for the new animations. There are many small applications written for the new Animations category (at the top of the list of demos in the application, right before the word App. I like working on animation because it usually comes first in the alphabet).In fact, here's a quick video showing some of the animation code at work. The video starts off on the home screen of the device, where you can see some of the animation system at work in the transitions between screens. Then the video shows a sampling of some of the API Demos applications, to show the various kinds of things that the new animation system can do. This video was taken straight from the screen of a Honeycomb device, so this is what you should see on your system, once you install API Demos from the SDK.
AnimatorAnimatoris the superclass of the new animation classes, and has some of the common attributes and functionality of the subclasses. The subclasses areValueAnimator, which is the core timing engine of the system and which we'll see in the next section, andAnimatorSet, which is used to choreograph multiple animators together into a single animation. You do not useAnimatordirectly, but some of the methods and properties of the subclasses are exposed at this superclass level, like the duration, startDelay and listener functionality.The listeners tend to be important, because sometimes you want to key some action off of the end of an animation, such as removing a view after an animation fading it out is done. To listen for animator lifecycle events, implement theAnimatorListenerinterface and add your listener to the Animator in question. For example, to perform an action when the animator ends, you could do this:anim.addListener(new Animator.AnimatorListener() { public void onAnimationStart(Animator animation) {} public void onAnimationEnd(Animator animation) { // do something when the animation is done } public void onAnimationCancel(Animator animation) {} public void onAnimationRepeat(Animator animation) {} });As a convenience, there is an adapter class,AnimatorListenerAdapter, that stubs out these methods so that you only need to override the one(s) that you care about:anim.addListener(new AnimatorListenerAdapter() { public void onAnimationEnd(Animator animation) { // do something when the animation is done } });ValueAnimatorValueAnimatoris the main workhorse of the entire system. It runs the internal timing loop that causes all of a process's animations to calculate and set values and has all of the core functionality that allows it to do this, including the timing details of each animation, information about whether an animation repeats, listeners that receive update events, and the capability of evaluating different types of values (seeTypeEvaluatorfor more on this). There are two pieces to animating properties: calculating the animated values and setting those values on the object and property in question.ValueAnimatortakes care of the first part; calculating the values. TheObjectAnimatorclass, which we'll see next, is responsible for setting those values on target objects.Most of the time, you will want to useObjectAnimator, because it makes the whole process of animating values on target objects much easier. But sometimes you may want to useValueAnimatordirectly. For example, the object you want to animate may not expose setter functions necessary for the property animation system to work. Or perhaps you want to run a single animation and set several properties from that one animated value. Or maybe you just want a simple timing mechanism. Whatever the case, usingValueAnimatoris easy; you just set it up with the animation properties and values that you want and start it. For example, to animate values between 0 and 1 over a half-second, you could do this:ValueAnimator anim = ValueAnimator.ofFloat(0f, 1f); anim.setDuration(500); anim.start();But animations are a bit like the tree in the forest philosophy question ("If a tree falls in the forest and nobody is there to hear it, does it make a sound?"). If you don't actually do anything with the values, does the animation run? Unlike the tree question, this one has an answer: of course it runs. But if you're not doing anything with the values, it might as well not be running. If you started it, chances are you want to do something with the values that it calculates along the way. So you add a listener to it, to listen for updates at each frame. And when you get the callback, you callgetAnimatedValue(), which returns anObject, to find out what the current value is.anim.addUpdateListener(new ValueAnimator.AnimatorUpdateListener() { public void onAnimationUpdate(ValueAnimator animation) { Float value = (Float) animation.getAnimatedValue(); // do something with value... } });Of course, you don't necessarily always want to animatefloatvalues. Maybe you need to animate something that's an integer instead:ValueAnimator anim = ValueAnimator.ofInt(0, 100);or in XML:<animator xmlns:android="http://schemas.android.com/apk/res/android" android:valueFrom="0" android:valueTo="100" android:valueType="intType"/>In fact, maybe you need to animate something entirely different, like aPoint, or aRect, or some custom data structure of your own. The only types that the animation system understands by default arefloatandint, but that doesn't mean that you're stuck with those two types. You can to use theObjectversion of the factory method, along with aTypeEvaluator(explained later), to tell the system how to calculate animated values for this unknown type:Point p0 = new Point(0, 0); Point p1 = new Point(100, 200); ValueAnimator anim = ValueAnimator.ofObject(pointEvaluator, p0, p1);There are other animation attributes that you can set on aValueAnimatorbesides duration, including:setStartDelay(long): This property controls how long the animation waits after a call tostart()before it starts playing.setRepeatCount(int)andsetRepeatMode(int): These functions control how many times the animation repeats and whether it repeats in a loop or reverses direction each time.setInterpolator(TimeInterpolator): This object controls the timing behavior of the animation. By default, animations accelerate into and decelerate out of the motion, but you can change that behavior by setting a different interpolator. This function acts just like the one of the same name in the previousAnimationclass; it's just that the type of the parameter (TimeInterpolator) is different from that of the previous version (Interpolator). But theTimeInterpolatorinterface is just a super-interface of the existingInterpolatorinterface in theandroid.view.animationpackage, so you can use any of the existingInterpolatorimplementations, likeBounce, as arguments to this function onValueAnimator.
ObjectAnimatorObjectAnimatoris probably the main class that you will use in the new animation system. You use it to construct animations with the timing and values thatValueAnimatortakes, and also give it a target object and property name to animate. It then quietly animates the value and sets those animated values on the specified object/property. For example, to fade out some objectmyObject, we could animate thealphaproperty like this:ObjectAnimator.ofFloat(myObject, "alpha", 0f).start();Note, in this example, a special feature that you can use to make your animations more succinct; you can tell it the value to animate to, and it will use the current value of the property as the starting value. In this case, the animation will start from whatever valuealphahas now and will end up at 0.You could create the same thing in an XML resource as follows:<objectAnimator xmlns:android="http://schemas.android.com/apk/res/android" android:valueTo="0" android:propertyName="alpha"/>Note, in the XML version, that you cannot set the target object; this must be done in code after the resource is loaded:ObjectAnimator anim = AnimatorInflator.loadAnimator(context, resID); anim.setTarget(myObject); anim.start();There is a hidden assumption here about properties and getter/setter functions that you have to understand before using ObjectAnimator: you must have a public "set" function on your object that corresponds to the property name and takes the appropriate type. Also, if you use only one value, as in the example above, your are asking the animation system to derive the starting value from the object, so you must also have a public "get" function which returns the appropriate type. For example, the class ofmyObjectin the code above must have these two public functions in order for the animation to succeed:public void setAlpha(float value); public float getAlpha();So by passing in a target object of some type and the name of some propertyfoosupposedly on that object, you are implicitly declaring a contract that that object has at least asetFoo()function and possibly also agetFoo()function, both of which handle the type used in the animation declaration. If all of this is true, then the animation will be able to find those setter/getter functions on the object and set values during the animation. If the functions do not exist, then the animation will fail at runtime, since it will be unable to locate the functions it needs. (Note to users of ProGuard, or other code-stripping utilities: If your setter/getter functions are not used anywhere else in the code, make sure you tell the utility to leave the functions there, because otherwise they may get stripped out. The binding during animation creation is very loose and these utilities have no way of knowing that these functions will be required at runtime.)View properties
The observant reader, or at least the ones that have not yet browsed on to some other article, may have pinpointed a flaw in the system thus far. If the new animation framework revolves around animating properties, and if animations will be used to animate, to a large extent, View objects, then how can they be used against the View class, which exposes none of its properties through set/get functions?Excellent question: you get to advance to the bonus round and keep reading.The way it works is that we added new properties to the View class in Honeycomb. The old animation system transformed and faded View objects by just changing the way that they were drawn. This was actually functionality handled in the container of each View, because the View itself had no transform properties to manipulate. But now it does: we've added several properties to View to make it possible to animate Views directly, allowing you to not only transform the way a View looks, but to transform its actual location and orientation. Here are the new properties in View that you can set, get and animate directly:translationXandtranslationY: These properties control where the View is located as a delta from itsleftandtopcoordinates which are set by its layout container. You can run a move animation on a button by animating these, like this:ObjectAnimator.ofFloat(view, "translationX", 0f, 100f);.rotation,rotationX, androtationY: These properties control the rotation in 2D (rotation) and 3D around the pivot point.scaleXandscaleY: These properties control the 2D scaling of a View around its pivot point.pivotXandpivotY: These properties control the location of the pivot point, around which the rotation and scaling transforms occur. By default, the pivot point is centered at the center of the object.xandy: These are simple utility properties to describe the final location of the View in its container, as a sum of the left/top and translationX/translationY values.alpha: This is my personal favorite property. No longer is it necessary to fade out an object by changing a value on its transform (a process which just didn't seem right). Instead, there is an actualalphavalue on the View itself. This value is 1 (opaque) by default, with a value of 0 representing full transparency (i.e., it won't be visible). To fade a View out, you can do this:ObjectAnimator.ofFloat(view, "alpha", 0f);
Note that all of the "properties" described above are actually available in the form of set/get functions (e.g.,setRotation()andgetRotation()for therotationproperty). This makes them both possible to access from the animation system and (probably more importantly) likely to do the right thing when changed. That is, you don't want to scale an object and have it just sit there because the system didn't know that it needed to redraw the object in its new orientation; each of the setter functions takes care to run the appropriate invalidation step to make the rendering work correctly.AnimatorSetThis class, like the previousAnimationSet, exists to make it easier to choreograph multiple animations. Suppose you want several animations running in tandem, like you want to fade out several views, then slide in other ones while fading them in. You could do all of this with separate animations and either manually starting the animations at the right times or withstartDelays set on the various delayed animations. Or you could useAnimatorSetto do all of that for you.AnimatorSetallows you to animations that play together,playTogether(Animator...), animations that play one after the other,playSequentially(Animator...), or you can organically build up a set of animations that play together, sequentially, or with specified delays by calling the functions in theAnimatorSet.Builderclass,with(),before(), andafter(). For example, to fade out v1 and then slide in v2 while fading it, you could do something like this:ObjectAnimator fadeOut = ObjectAnimator.ofFloat(v1, "alpha", 0f); ObjectAnimator mover = ObjectAnimator.ofFloat(v2, "translationX", -500f, 0f); ObjectAnimator fadeIn = ObjectAnimator.ofFloat(v2, "alpha", 0f, 1f); AnimatorSet animSet = new AnimatorSet().play(mover).with(fadeIn).after(fadeOut);; animSet.start();LikeValueAnimatorandObjectAnimator, you can createAnimatorSetobjects in XML resources as well.TypeEvaluatorI wanted to talk about just one more thing, and then I'll leave you alone to explore the code and play with the API demos. The last class I wanted to mention isTypeEvaluator. You may not use this class directly for most of your animations, but you should that it's there in case you need it. As I said earlier, the system knows how to animatefloatandintvalues, but otherwise it needs some help knowing how to interpolate between the values you give it. For example, if you want to animate between thePointvalues in one of the examples above, how is the system supposed to know how to interpolate the values between the start and end points? Here's the answer: you tell it how to interpolate, usingTypeEvaluator.TypeEvaluatoris a simple interface that you implement that the system calls on each frame to help it calculate an animated value. It takes a floating point value which represents the current elapsed fraction of the animation and the start and end values that you supplied when you created the animation and it returns the interpolated value between those two values at that fraction. For example, here's the built-inFloatEvaluatorclass used to calculate animated floating point values:public class FloatEvaluator implements TypeEvaluator { public Object evaluate(float fraction, Object startValue, Object endValue) { float startFloat = ((Number) startValue).floatValue(); return startFloat + fraction * (((Number) endValue).floatValue() - startFloat); } }But how does it work with a more complex type? For an example of that, here is an implementation of an evaluator for thePointclass, from our earlier example:public class PointEvaluator implements TypeEvaluator { public Object evaluate(float fraction, Object startValue, Object endValue) { Point startPoint = (Point) startValue; Point endPoint = (Point) endValue; return new Point(startPoint.x + fraction * (endPoint.x - startPoint.x), startPoint.y + fraction * (endPoint.y - startPoint.y)); } }Basically, this evaluator (and probably any evaluator you would write) is just doing a simple linear interpolation between two values. In this case, each 'value' consists of two sub-values, so it is linearly interpolating between each of those.You tell the animation system to use your evaluator by either calling thesetEvaluator()method onValueAnimatoror by supplying it as an argument in the Object version of the factory method. To continue our earlier example animatingPointvalues, you could use our newPointEvaluatorclass above to complete that code:Point p0 = new Point(0, 0); Point p1 = new Point(100, 200); ValueAnimator anim = ValueAnimator.ofObject(new PointEvaluator(), p0, p1);One of the ways that you might use this interface is through theArgbEvaluatorimplementation, which is included in the Android SDK. If you animate a color property, you will probably either use this evaluator automatically (which is the case if you create an animator in an XML resource and supply colors as values) or you can set it manually on the animator as described in the previous section.But Wait, There's More!
There's so much more to the new animation system that I haven't gotten to. There's the repetition functionality, the listeners for animation lifecycle events, the ability to supply multiple values to the factory methods to get animations between more than just two endpoints, the ability to use theKeyframeclass to specify a more complex time/value sequence, the use ofPropertyValuesHolderto specify multiple properties to animate in parallel, theLayoutTransitionclass for automating simple layout animations, and so many other things. But I really have to stop writing soon and get back to working on the code. I'll try to post more articles in the future on some of these items, but also keep an eye on my blog at graphics-geek.blogspot.com for upcoming articles, tutorials, and videos on this and related topics. Until then, check out the API demos, read the overview of Property Animation posted with the 3.0 SDK, dive into the code, and just play with it.


Best Practices for Honeycomb and Tablets
Posted: 2011-02-23 10:07:49 UTC-08:00
The first tablets running Android 3.0 (“Honeycomb”) will be hitting the streets on Thursday Feb. 24th, and we’ve just posted the full SDK release. We encourage you to test your applications on the new platform, using a tablet-size AVD.Developers who’ve followed the Android Framework’s guidelines and best practices will find their apps work well on Android 3.0. This purpose of this post is to provide reminders of and links to those best practices.Moving Toward Honeycomb
There’s a comprehensive discussion of how to work with the new release in Optimizing Apps for Android 3.0. The discussion includes the use of the emulator; most developers, who don’t have an Android tablet yet, should use it to test and update their apps for Honeycomb.While your existing apps should work well, developers also have the option to improve their apps’ look and feel on Android 3.0 by using Honeycomb features; for example, see The Android 3.0 Fragments API. We’ll have more on that in this space, but in the meantime we recommend reading Strategies for Honeycomb and Backwards Compatibility for advice on adding Honeycomb polish to existing apps.Specifying Features
There have been reports of apps not showing up in Android Market on tablets. Usually, this is because your application manifest has something like this:<uses-feature android:name="android.hardware.telephony" />Many of the tablet devices aren’t phones, and thus Android Market assumes the app is not compatible. Seethe documentation of <uses-feature>. However, such an app’s use of the telephony APIs might well be optional, in which case it should be available on tablets. There’s a discussion of how to accomplish this inFuture-Proofing Your App and The Five Steps to Future Hardware Happiness.Rotation
The new environment is different from what we’re used to in two respects. First, you can hold the devices with any of the four sides up and Honeycomb manages the rotation properly. In previous versions, often only two of the four orientations were supported, and there are apps out there that relied on this in ways that will break them on Honeycomb. If you want to stay out of rotation trouble, One Screen Turn Deserves Anothercovers the issues.The second big difference doesn’t have anything to do with software; it’s that a lot of people are going to hold these things horizontal (in “landscape mode”) nearly all the time. We’ve seen a few apps that have a buggy assumption that they’re starting out in portrait mode, and others that lock certain screens into portrait or landscape but really shouldn’t.A Note for Game Developers
A tablet can probably provide a better game experience for your users than any handset can. Bigger is better. It’s going to cost you a little more work than developers of business apps, because quite likely you’ll want to rework your graphical assets for the big screen.There’s another issue that’s important to game developers: Texture Formats. Read about this in Game Development for Android: A Quick Primer, in the section labeled “Step Three: Carefully Design the Best Game Ever”.We've also added a convenient way to filter applications in Android Market based on the texture formats they support; see the documentation of <supports-gl-texture> for more details.Happy Coding
Once you’ve held one of the new tablets in your hands, you’ll want to have your app not just running on it (which it probably already does), but expanding minds on the expanded screen. Have fun!

Final Android 3.0 Platform and Updated SDK Tools
Posted: 2011-02-22 14:09:29 UTC-08:00

We are pleased to announce that the full SDK for Android 3.0 is now available to developers. The APIs are final, and you can now develop apps targeting this new platform and publish them to Android Market. The new API level is 11.For an overview of the new user and developer features, see theAndroid 3.0 Platform Highlights.Together with the new platform, we are releasing updates to our SDK Tools (r10) and ADT Plugin for Eclipse (10.0.0). Key features include:- UI Builder improvements in the ADT Plugin:
- New Palette with categories and rendering previews. (details)
- More accurate rendering of layouts to more faithfully reflect how the layout will look on devices, including rendering status and title bars to more accurately reflect screen space actually available to applications.
- Selection-sensitive action bars to manipulate View properties.
- Zoom improvements (fit to view, persistent scale, keyboard access) (details).
- Improved support for <merge> layouts, as well as layouts with gesture overlays.
- Traceview integration for easier profiling from ADT. (details)
- Tools for using the Renderscript graphics engine: the SDK tools now compiles .rs files into Java Programming Language files and native bytecode.
To get started developing or testing applications on Android 3.0, visit the Android Developers site for information about the Android 3.0 platform, the SDK Tools, and the ADT Plugin.

Introducing Renderscript
Posted: 2011-02-09 15:36:59 UTC-08:00
[This post is by R. Jason Sams, an Android engineer who specializes in graphics, performance tuning, and software architecture. —Tim Bray]Renderscript is a key new Honeycomb feature which we haven’t yet discussed in much detail. I will address this in two parts. This post will be a quick overview of Renderscript. A more detailed technical post with a simple example will be provided later.Renderscript is a new API targeted at high-performance 3D rendering and compute operations. The goal of Renderscript is to bring a lower level, higher performance API to Android developers. The target audience is the set of developers looking to maximize the performance of their applications and are comfortable working closer to the metal to achieve this. It provides the developer three primary tools: A simple 3D rendering API on top of hardware acceleration, a developer friendly compute API similar to CUDA, and a familiar language in C99.Renderscript has been used in the creation of the new visually-rich YouTube and Books apps. It is the API used in the live wallpapers shipping with the first Honeycomb tablets.The performance gain comes from executing native code on the device. However, unlike the existing NDK, this solution is cross-platform. The development language for Renderscript is C99 with extensions, which is compiled to a device-agnostic intermediate format during the development process and placed into the application package. When the app is run, the scripts are compiled to machine code and optimized on the device. This eliminates the problem of needing to target a specific machine architecture during the development process.Renderscript is not intended to replace the existing high-level rendering APIs or languages on the platform. The target use is for performance-critical code segments where the needs exceed the abilities of the existing APIs.It may seem interesting that nothing above talked about running code on CPUs vs. GPUs. The reason is that this decision is made on the device at runtime. Simple scripts will be able to run on the GPU as compute workloads when capable hardware is available. More complex scripts will run on the CPU(s). The CPU also serves as a fallback to ensure that scripts are always able to run even if a suitable GPU or other accelerator is not present. This is intended to be transparent to the developer. In general, simpler scripts will be able to run in more places in the future. For now we simply leverage the CPU resources and distribute the work across as many CPUs as are present in the device.
The video above, captured through an Android tablet’s HDMI out, is an example of Renderscript compute at work. (There’s a high-def version on YouTube.) In the video we show a simple brute force physics simulation of around 900 particles. The compute script runs each frame and automatically takes advantage of both cores. Once the physics simulation is done, a second graphics script does the rendering. In the video we push one of the larger balls to show the interaction. Then we tilt the tablet and let gravity do a little work. This shows the power of the dual A9s in the new Honeycomb tablet.Renderscript Graphics provides a new runtime for continuously rendering scenes. This runtime sits on top of HW acceleration and uses the developers’ scripts to provide custom functionality to the controlling Dalvik code. This controlling code will send commands to it at a coarse level such as “turn the page” or “move the list”. The commands the two sides speak are determined by the scripts the developer provides. In this way it’s fully customizable. Early examples of Renderscript graphics were the live wallpapers and 3d application launcher that shipped with Eclair.With Honeycomb, we have migrated from GL ES 1.1 to 2.0 as the renderer for Renderscript. With this, we have added programmable shader support, 3D model loading, and much more efficient allocation management. The new compiler, based on LLVM, is several times more efficient than acc was during the Eclair-through-Gingerbread time frame. The most important change is that the Renderscript API and tools are now public.
The screenshot above was taken from one of our internal test apps. The application implements a simple scene-graph which demonstrates recursive script to script calling. The Androids are loaded from an A3D file created in Maya and translated from a Collada file. A3D is an on device file format for storing Renderscript objects.Later we will follow up with more technical information and sample code.


Android 2.3.3 Platform, New NFC Capabilities
Posted: 2011-02-09 10:10:10 UTC-08:00
Several weeks ago we released Android 2.3, which introduced several new forms of communication for developers and users. One of those, Near Field Communications (NFC), let developers get started creating a new class of contactless, proximity-based applications for users.NFC is an emerging technology that promises exciting new ways to use mobile devices, including ticketing, advertising, ratings, and even data exchange with other devices. We know there’s a strong interest to include these capabilities into many applications, so we’re happy to announce an update to Android 2.3 that adds new NFC capabilities for developers. Some of the features include:- A comprehensive NFC reader/writer API that lets apps read and write to almost any standard NFC tag in use today.
- Advanced Intent dispatching that gives apps more control over how/when they are launched when an NFC tag comes into range.
- Some limited support for peer-to-peer connection with other NFC devices.
We hope you’ll find these new capabilities useful and we’re looking forward to seeing the innovative apps that you will create using them.Android 2.3.3 is a small feature release that includes a new API level, 10. Going forward, we expect most devices shipping with an Android 2.3 platform to run Android 2.3.3 (or later). For an overview of the API changes, see the Android 2.3.3 Version Notes. The Android 2.3.3 SDK platform for development and testing is available through the Android SDK Manager.

The Android 3.0 Fragments API
Posted: 2011-02-03 13:56:14 UTC-08:00
[This post is by Dianne Hackborn, a Software Engineer who sits very near the exact center of everything Android. — Tim Bray]
An important goal for Android 3.0 is to make it easier for developers to write applications that can scale across a variety of screen sizes, beyond the facilities already available in the platform:- Since the beginning, Android’s UI framework has been designed around the use of layout managers, allowing UIs to be described in a way that will adjust to the space available. A common example is a ListView whose height changes depending on the size of the screen, which varies a bit between QVGA, HVGA, and WVGA aspect ratios.
- Android 1.6 introduced a new concept of screen densities, making it easy for apps to scale between different screen resolutions when the screen is about the same physical size. Developers immediately started using this facility when higher-resolution screens were introduced, first on Droid and then on other phones.
- Android 1.6 also made screen sizes accessible to developers, classifying them into buckets: “small” for QVGA aspect ratios, “normal” for HVGA and WVGA aspect ratios, and “large” for larger screens. Developers can use the resource system to select between different layouts based on the screen size.
The combination of layout managers and resource selection based on screen size goes a long way towards helping developers build scalable UIs for the variety of Android devices we want to enable. As a result, many existing handset applications Just Work under Honeycomb on full-size tablets, without special compatibility modes, with no changes required. However, as we move up into tablet-oriented UIs with 10-inch screens, many applications also benefit from a more radical UI adjustment than resources can easily provide by themselves.Introducing the Fragment
Android 3.0 further helps applications adjust their interfaces with a new class called Fragment. A Fragment is a self-contained component with its own UI and lifecycle; it can be-reused in different parts of an application’s user interface depending on the desired UI flow for a particular device or screen.In some ways you can think of a Fragment as a mini-Activity, though it can’t run independently but must be hosted within an actual Activity. In fact the introduction of the Fragment API gave us the opportunity to address many of the pain points we have seen developers hit with Activities, so in Android 3.0 the utility of Fragment extends far beyond just adjusting for different screens:- Embedded Activities via ActivityGroup were a nice idea, but have always been difficult to deal with since Activity is designed to be an independent self-contained component instead of closely interacting with other activities. The Fragment API is a much better solution for this, and should be considered as a replacement for embedded activities.
- Retaining data across Activity instances could be accomplished through Activity.onRetainNonConfigurationInstance(), but this is fairly klunky and non-obvious. Fragment replaces that mechanism by allowing you to retain an entire Fragment instance just by setting a flag.
- A specialization of Fragment called DialogFragment makes it easy to show a Dialog that is managed as part of the Activity lifecycle. This replaces Activity’s “managed dialog” APIs.
- Another specialization of Fragment called ListFragment makes it easy to show a list of data. This is similar to the existing ListActivity (with a few more features), but should reduce the common question about how to show a list with some other data.
- The information about all fragments currently attached to an activity is saved for you by the framework in the activity’s saved instance state and restored for you when it restarts. This can greatly reduce the amount of state save and restore code you need to write yourself.
- The framework has built-in support for managing a back-stack of Fragment objects, making it easy to provide intra-activity Back button behavior that integrates the existing activity back stack. This state is also saved and restored for you automatically.
Getting started
To whet your appetite, here is a simple but complete example of implementing multiple UI flows using fragments. We first are going to design a landscape layout, containing a list of items on the left and details of the selected item on the right. This is the layout we want to achieve:
The code for this activity is not interesting; it just calls setContentView() with the given layout:<LinearLayout xmlns:android="http://schemas.android.com/apk/res/android" android:orientation="horizontal" android:layout_width="match_parent" android:layout_height="match_parent"> <fragment class="com.example.android.apis.app.TitlesFragment" android:id="@+id/titles" android:layout_weight="1" android:layout_width="0px" android:layout_height="match_parent" /> <FrameLayout android:id="@+id/details" android:layout_weight="1" android:layout_width="0px" android:layout_height="match_parent" /> </LinearLayout>You can see here our first new feature: the<fragment>tag allows you to automatically instantiate and install a Fragment subclass into your view hierarchy. The fragment being implemented here derives from ListFragment, displaying and managing a list of items the user can select. The implementation below takes care of displaying the details of an item either in-place or as a separate activity, depending on the UI layout. Note how changes to fragment state (the currently shown details fragment) are retained across configuration changes for you by the framework.public static class TitlesFragment extends ListFragment { boolean mDualPane; int mCurCheckPosition = 0; @Override public void onActivityCreated(Bundle savedState) { super.onActivityCreated(savedState); // Populate list with our static array of titles. setListAdapter(new ArrayAdapter<String>(getActivity(), R.layout.simple_list_item_checkable_1, Shakespeare.TITLES)); // Check to see if we have a frame in which to embed the details // fragment directly in the containing UI. View detailsFrame = getActivity().findViewById(R.id.details); mDualPane = detailsFrame != null && detailsFrame.getVisibility() == View.VISIBLE; if (savedState != null) { // Restore last state for checked position. mCurCheckPosition = savedState.getInt("curChoice", 0); } if (mDualPane) { // In dual-pane mode, list view highlights selected item. getListView().setChoiceMode(ListView.CHOICE_MODE_SINGLE); // Make sure our UI is in the correct state. showDetails(mCurCheckPosition); } } @Override public void onSaveInstanceState(Bundle outState) { super.onSaveInstanceState(outState); outState.putInt("curChoice", mCurCheckPosition); } @Override public void onListItemClick(ListView l, View v, int pos, long id) { showDetails(pos); } /** * Helper function to show the details of a selected item, either by * displaying a fragment in-place in the current UI, or starting a * whole new activity in which it is displayed. */ void showDetails(int index) { mCurCheckPosition = index; if (mDualPane) { // We can display everything in-place with fragments. // Have the list highlight this item and show the data. getListView().setItemChecked(index, true); // Check what fragment is shown, replace if needed. DetailsFragment details = (DetailsFragment) getFragmentManager().findFragmentById(R.id.details); if (details == null || details.getShownIndex() != index) { // Make new fragment to show this selection. details = DetailsFragment.newInstance(index); // Execute a transaction, replacing any existing // fragment with this one inside the frame. FragmentTransaction ft = getFragmentManager().beginTransaction(); ft.replace(R.id.details, details); ft.setTransition( FragmentTransaction.TRANSIT_FRAGMENT_FADE); ft.commit(); } } else { // Otherwise we need to launch a new activity to display // the dialog fragment with selected text. Intent intent = new Intent(); intent.setClass(getActivity(), DetailsActivity.class); intent.putExtra("index", index); startActivity(intent); } } }For this first screen we need an implementation of DetailsFragment, which simply shows a TextView containing the text of the currently selected item.public static class DetailsFragment extends Fragment { /** * Create a new instance of DetailsFragment, initialized to * show the text at 'index'. */ public static DetailsFragment newInstance(int index) { DetailsFragment f = new DetailsFragment(); // Supply index input as an argument. Bundle args = new Bundle(); args.putInt("index", index); f.setArguments(args); return f; } public int getShownIndex() { return getArguments().getInt("index", 0); } @Override public View onCreateView(LayoutInflater inflater, ViewGroup container, Bundle savedInstanceState) { if (container == null) { // Currently in a layout without a container, so no // reason to create our view. return null; } ScrollView scroller = new ScrollView(getActivity()); TextView text = new TextView(getActivity()); int padding = (int)TypedValue.applyDimension( TypedValue.COMPLEX_UNIT_DIP, 4, getActivity().getResources().getDisplayMetrics()); text.setPadding(padding, padding, padding, padding); scroller.addView(text); text.setText(Shakespeare.DIALOGUE[getShownIndex()]); return scroller; } }It is now time to add another UI flow to our application. When in portrait orientation, there is not enough room to display the two fragments side-by-side, so instead we want to show only the list like this:
With the code shown so far, all we need to do here is introduce a new layout variation for portrait screens like so:<FrameLayout xmlns:android="http://schemas.android.com/apk/res/android" android:layout_width="match_parent" android:layout_height="match_parent"> <fragment class="com.example.android.apis.app.TitlesFragment" android:id="@+id/titles" android:layout_width="match_parent" android:layout_height="match_parent" /> </FrameLayout>The TitlesFragment will notice that it doesn’t have a container in which to show its details, so show only its list. When you tap on an item in the list we now need to go to a separate activity in which the details are shown.
With the DetailsFragment already implemented, the implementation of the new activity is very simple because it can reuse the same DetailsFragment from above:public static class DetailsActivity extends FragmentActivity { @Override protected void onCreate(Bundle savedInstanceState) { super.onCreate(savedInstanceState); if (getResources().getConfiguration().orientation == Configuration.ORIENTATION_LANDSCAPE) { // If the screen is now in landscape mode, we can show the // dialog in-line so we don't need this activity. finish(); return; } if (savedInstanceState == null) { // During initial setup, plug in the details fragment. DetailsFragment details = new DetailsFragment(); details.setArguments(getIntent().getExtras()); getSupportFragmentManager().beginTransaction().add( android.R.id.content, details).commit(); } } }Put that all together, and we have a complete working example of an application that fairly radically changes its UI flow based on the screen it is running on, and can even adjust it on demand as the screen configuration changes.This illustrates just one way fragments can be used to adjust your UI. Depending on your application design, you may prefer other approaches. For example, you could put your entire application in one activity in which you change the fragment structure as its state changes; the fragment back stack can come in handy in this case.More information on the Fragment and FragmentManager APIs can be found in the Android 3.0 SDK documentation. Also be sure to look at the ApiDemos app under the Resources tab, which has a variety of Fragment demos covering their use for alternative UI flow, dialogs, lists, populating menus, retaining across activity instances, the back stack, and more.Fragmentation for all!
For developers starting work on tablet-oriented applications designed for Android 3.0, the new Fragment API is useful for many design situations that arise from the larger screen. Reasonable use of fragments should also make it easier to adjust the resulting application’s UI to new devices in the future as needed -- for phones, TVs, or wherever Android appears.However, the immediate need for many developers today is probably to design applications that they can provide for existing phones while also presenting an improved user interface on tablets. With Fragment only being available in Android 3.0, their shorter-term utility is greatly diminished.To address this, we plan to have the same fragment APIs (and the new LoaderManager as well) described here available as a static library for use with older versions of Android; we’re trying to go right back to 1.6. In fact, if you compare the code examples here to those in the Android 3.0 SDK, they are slightly different: this code is from an application using an early version of the static library fragment classes which is running, as you can see on the screenshots, on Android 2.3. Our goal is to make these APIs nearly identical, so you can start using them now and, at whatever point in the future you switch to Android 3.0 as your minimum version, move to the platform’s native implementation with few changes in your app.We don’t have a firm date for when this library will be available, but it should be relatively soon. In the meantime, you can start developing with fragments on Android 3.0 to see how they work, and most of that effort should be transferable.


New Merchandising and Billing Features on Android Market
Posted: 2011-02-03 14:40:47 UTC-08:00
[This post is by Eric Chu, Android Developer Ecosystem. —Dirk Dougherty]Following on last week’s announcement of the Android 3.0 Preview SDK, I’d like to share some more good news with you about three important new features on Android Market.Android Market on the Web
Starting today, we have extended Android Market client from mobile devices to every desktop. Anyone can now easily find and share applications from their favorite browser. Once users select an application they want, it will automatically be downloaded to their Android-powered devices over-the-air.Android Market on the Web dramatically expands the discoverability of applications through a rich browsing experience, suggestion-guided searching, deep linking, social sharing, and other merchandising features.We are releasing the initial version of Android Market on the Web in English and will be extending it to other languages in the weeks ahead.If you have applications published on Android Market, we encourage you to visit the site and review how they are presented. If you need additional information about what assets you should provide, please visit Android Market Help Center.You can access Android Market on the Web at:Buyer’s Currency
Android Market lets you sell applications to users in 32 buyer countries around the world. Today we’re introducing Buyer’s Currency to give you more control over how you price your products across those countries. This feature lets you price your applications differently in each market and improves the purchase experience for buyers by showing prices in their home currencies.We’ll be rolling out Buyer’s Currency in stages, starting with developers in the U.S. and reaching developers in other countries shortly after. We anticipate it will take approximately four months for us to complete this process.We encourage you to watch for the appearance of new Buyer’s Currency options in the Android Market publishing console and set prices as soon as possible.In-app Billing
After months of hard work by the Android Market team, I am extremely pleased to announce the arrival of In-app Billing on Android Market. This new service gives developers more ways to monetize their applications through new billing models including try-and-buy, virtual goods, upgrades, and more.The In-app Billing service manages billing transactions between apps and users, providing a consistent purchasing experience with familiar forms of payment across all apps. At the same time, it gives you full control over how your digital goods are purchased and tracked. You can let Android Market manage and track the purchases for you or you can integrate with your own back-end service to verify and track purchases in the way that's best for your app.We’ll be launching In-app Billing in stages. Beginning today, we are providing detailed documentation and a sample application to help you get familiar with the service. Over the next few weeks we’ll be rolling out updates to the Android Market client that will enable you to test against the In-app Billing service. Before the end of this quarter, the service will be live for users, to enable you to start monetizing your applications with this new capability. For complete information about the rollout, see the release information in the In-app Billing documentation.Helping developers merchandise and monetize their products is a top priority for the Android Market team. We will continue to work hard to to make it the best marketplace for your to distribute your products. For now, we hope you’ll check out these new features to help you better deliver your products through Android Market.


Android 3.0 Platform Preview and Updated SDK Tools
Posted: 2011-01-26 11:29:55 UTC-08:00
Android 3.0 (Honeycomb) is a new version of the Android platform that is designed from the ground up for devices with larger screen sizes, particularly tablets. It introduces a new “holographic” UI theme and an interaction model that builds on the things people love about Android — multitasking, notifications, widgets, and others — and adds many new features as well.Besides the user-facing features it offers, Android 3.0 is also specifically designed to give developers the tools and capabilities they need to create great applications for tablets and similar devices, together with the flexibility to adapt existing apps to the new UI while maintaining compatibility with earlier platform versions and other form-factors.Today, we are releasing a preview of the Android 3.0 SDK, with non-final APIs and system image, to allow developers to start testing their existing applications on the tablet form-factor and begin getting familiar with the new UI patterns, APIs, and capabilties that will be available in Android 3.0.Here are some of the highlights:- UI framework for creating great apps for larger screen devices: Developers can use a new UI components, new themes, richer widgets and notifications, drag and drop, and other new features to create rich and engaging apps for users on larger screen devices.High-performance 2D and 3D graphics: A new property-based animation framework lets developers add great visual effects to their apps. A built-in GL renderer lets developers request hardware-acceleration of common 2D rendering operations in their apps, across the entire app or only in specific activities or views. For adding rich 3D scenes, developers take advantage of a new 3D graphics engine called Renderscript.Support for multicore processor architectures: Android 3.0 is optimized to run on either single- or dual-core processors, so that applications run with the best possible performance.Rich multimedia: New multimedia features such as HTTP Live streaming support, a pluggable DRM framework, and easy media file transfer through MTP/PTP, give developers new ways to bring rich content to users.New types of connectivity: New APIs for Bluetooth A2DP and HSP let applications offer audio streaming and headset control. Support for Bluetooth insecure socket connection lets applications connect to simple devices that may not have a user interface.Enhancements for enterprise: New administrative policies, such as for encrypted storage and password expiration, help enterprise administrators manage devices more effectively.
For an complete overview of the new user and developer features, see the Android 3.0 Platform Highlights.Additionally, we are releasing updates to our SDK Tools (r9), NDK (r5b), and ADT Plugin for Eclipse (9.0.0). Key features include:- UI Builder improvements in the ADT Plugin:
- Improved drag-and-drop in the editor, with better support for included layouts.
- In-editor preview of objects animated with the new animation framework.
- Visualization of UI based on any version of the platform. independent of project target. Improved rendering, with better support for custom views.
To find out how to get started developing or testing applications using the Android 3.0 Preview SDK, see thePreview SDK Introduction. Details about the changes in the latest versions of the tools are available on theSDK Tools, the ADT Plugin, and NDK pages on the site.Note that applications developed with the Android 3.0 Platform Preview cannot be published on Android Market. We’ll be releasing a final SDK in the weeks ahead that you can use to build and publish applications for Android 3.0.

Processing Ordered Broadcasts
Posted: 2011-01-20 16:19:47 UTC-08:00

[This post is by Bruno Albuquerque, an engineer who works in Google’s office in Belo Horizonte, Brazil. —Tim Bray]One of the things that I find most interesting and powerful about Android is the concept of broadcasts and their use through the BroadcastReceiverclass (from now on, we will call implementations of this class “receivers”). As this document is about a very specific usage scenario for broadcasts, I will not go into detail about how they work in general, so I recommend reading the documentation about them in the Android developer site. For the purpose of this document, it is enough to know that broadcasts are generated whenever something interesting happens in the system (connectivity changes, for example) and you can register to be notified whenever one (or more) of those broadcasts are generated.While developing Right Number, I noticed that some developers who create receivers for ordered broadcasts do not seem to be fully aware of what is the correct way to do it. This suggests that the documentation could be improved; in any case, things often still work(although it is mostly by chance than anything else).Non-ordered vs. Ordered Broadcasts
In non-ordered mode, broadcasts are sent to all interested receivers “at the same time”. This basically means that one receiver can not interfere in any way with what other receivers will do neither can it prevent other receivers from being executed. One example of such broadcast is the ACTION_BATTERY_LOW one.In ordered mode, broadcasts are sent to each receiver in order (controlled by the android:priority attribute for the intent-filter element in the manifest file that is related to your receiver) and one receiver is able to abort the broadcast so that receivers with a lower priority would not receive it (thus never execute). An example of this type of broadcast (and one that will be discussing in this document) is theACTION_NEW_OUTGOING_CALL one.Ordered Broadcast Usage
As mentioned earlier in this document, the ACTION_NEW_OUTGOING_CALL broadcast is an ordered one. This broadcast is sent whenever the user tries to initiate a phone call. There are several reasons that one would want to be notified about this, but we will focus on only 2:- To be able to reject an outgoing call;
- To be able to rewrite the number before it is dialed.
In the first case, an app may want to control what numbers can be dialed or what time of the day numbers can be dialed. Right Number does what is described in the second case so it can be sure that a number is always dialed correctly no matter where in the world you are.A naive BroadcastReceiver implementation would be something like this (note that you should associate this receiver with the ACTION_NEW_OUTGOING_CALL broadcast in the manifest file for your application):public class CallReceiver extends BroadcastReceiver { @Override public void onReceive(Context context, Intent intent) { // Original phone number is in the EXTRA_PHONE_NUMBER Intent extra. String phoneNumber = intent.getStringExtra(Intent.EXTRA_PHONE_NUMBER); if (shouldCancel(phoneNumber)) { // Cancel our call. setResultData(null); } else { // Use rewritten number as the result data. setResultData(reformatNumber(phoneNumber)); } }The receiver either cancels the broadcast (and the call) or reformats the number to be dialed. If this is the only receiver that is active for the ACTION_NEW_OUTGOING_CALL broadcast, this will work exactly as expected. The problem arrises when you have, for example, a receiver that runs before the one above (has a higher priority) and that also changes the number as instead of looking at previous results of other receivers, we are just using the original (unmodified) number!Doing It Right
With the above in mind, here is how the code should have been written in the first place:public class CallReceiver extends BroadcastReceiver { @Override public void onReceive(Context context, Intent intent) { // Try to read the phone number from previous receivers. String phoneNumber = getResultData(); if (phoneNumber == null) { // We could not find any previous data. Use the original phone number in this case. phoneNumber = intent.getStringExtra(Intent.EXTRA_PHONE_NUMBER); } if (shouldCancel(phoneNumber)) { // Cancel our call. setResultData(null); } else { // Use rewritten number as the result data. setResultData(reformatNumber(phoneNumber)); } }We first check if we have any previous result data (which would be generated by a receiver with a higher priority) and only if we can not find it we use the phone number in the EXTRA_PHONE_NUMBER intent extra.How Big Is The Problem?
We have actually observed phones with a priority 0 receiver for the NEW_OUTGOING_CALL intent installed out of the box (this will be the last one that is called after all others) that completely ignores previous result data which means that, in effect, they disable any useful processing of ACTION_NEW_OUTGOING_CALL (other than canceling the call, which would still work). The only workaround for this is to also run your receiver at priority 0, which works due to particularities of running 2 receivers at the same priority but, by doing that, you break one of the few explicit rules for processing outgoing calls:“For consistency, any receiver whose purpose is to prohibit phone calls should have a priority of 0, to ensure it will see the final phone number to be dialed. Any receiver whose purpose is to rewrite phone numbers to be called should have a positive priority. Negative priorities are reserved for the system for this broadcast; using them may cause problems.”Conclusion
There are programs out there that do not play well with others. Urge any developers of such programs to read this post and fix their code. This will make Android better for both developers and users.Notes About Priorities
- For the NEW_OUTGOING_CALL intent, priority 0 should only be used by receivers that want to reject calls. This is so it can see changes from other receivers before deciding to reject the call or not.
- Receivers that have the same priority will also be executed in order, but the order in this case is undefined.
- Use non-negative priorities only. Negative ones are valid but will result in weird behavior most of the time.


No comments:
Post a Comment